Friday 28 May 2010

Exercise 19

What: The brief of this exercise was to locate and photograph subjects which demonstrated strong diagonal lines.
Where: Various Locations
When: All times of the day, sunny, rain and dull weather.
How: I had a good think about what subjects would be good for diagonal lines. Again after making some notes, I visited some of the sites and quickly discounted some of the ideas as either they just did not work or that they failed to express the concept.
I mainly relied on one camera on this exercise and all the photographs were taken where the camera was mounted on a tripod.
I did find on one occasional that although the camera and tripod were level, examination of the final image showed that the ground ran downhill on a slight tilt from left to right, I did not notice this in the viewfinder due to the brightness of the sun.

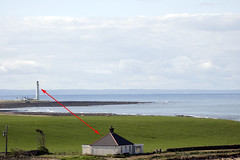
I went looking for subjects which would express the concept of diagonal lines in either an actual or artificial horizon to the point of view of the viewer.
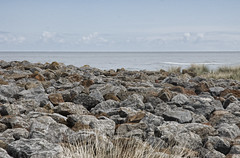
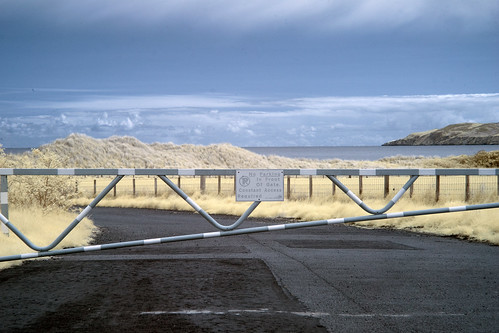
Coffin Alley

D80 Aperture f/22 Shutter Speed 1/8 ISO 160 11mm (35mm equivalent 16mm) Pattern Metering Mode, Auto White Balance, Tripod Mounted.

Coffin Alley

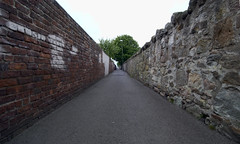
This lane goes on for quite a distance and on either side are high walls, one side brick and the other side stones. The lane is nicknamed “Coffin Alley” as it runs along the length of one of the graveyards, and was said to be the alley used to transport coffins to the graveyard.

I repeated the style of this shot, of not the subject, at a long pergola/tunnel structured by trees.
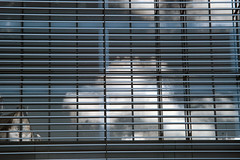
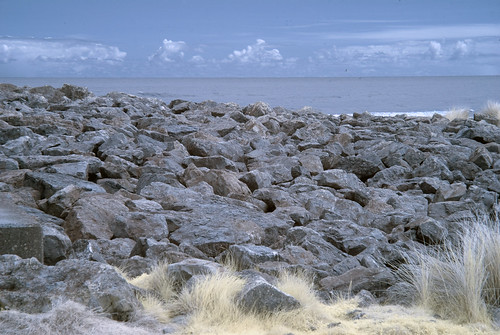
Lines of trees

D80 Aperture f/22 Shutter Speed 0.5 sec ISO 160 16mm (35mm equivalent 24mm)Pattern Metering Mode, Auto White Balance, Tripod Mounted

Pergola of Trees
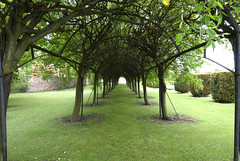
Again you have strong diagonal lines running into the centre of the frame, but this time the diagonal lines are repeated by the wall on the left hand side of the frame.

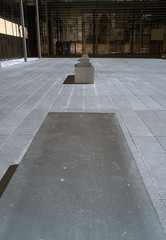
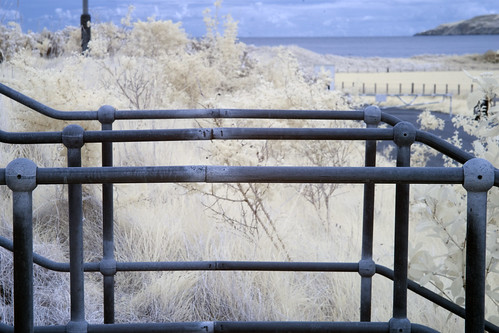
The third shot was where I decided to move the framing of the camera into a diagonal position to create the abstract diagonal lines running through the frame.

Diagonal Bench

D80 Aperture f/4.5 Shutter Speed 1/50 ISO 160 70mm (35mm equivalent 105mm) Pattern Metering Mode, Auto White Balance, Tripod Mounted


Diagonal3

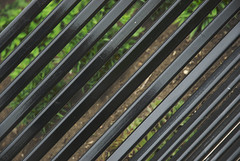
I liked the repetition and abstractness of this photograph, I feel that the combination of a large aperture and tight focus allows the eye to follow the lines through the frame.


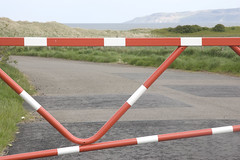
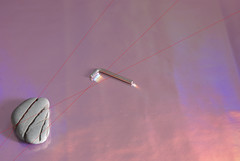
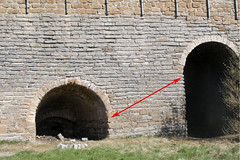
In the fourth shot, again I repeated tilting the camera, but this time I did this to capture the diagonal lines created by the walls supporting either side of each garage door. This along with the very strong diagonal grid on the ground produced strong diagonal lines and repetition of the structure.

Lines everywhere

D80 Aperture f9 Shutter Speed 1/50 ISO 160 56mm (35mm equivalent 84mm) Pattern Metering Mode, Auto White Balance, Tripod Mounted

Diagonal4

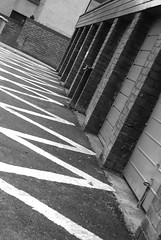
I liked doing this exercise as again it demonstrated and enforced that framing the main elements within a photograph can help to produce strong results, especially in perspective and demonstrating distance.

Thursday 13 May 2010

Exercise 18

What: The brief of this exercise was locate and photograph horizontal and vertical lines.
Where: Various Locations
When: All times of the day, sunny, rain and dull weather.
How: I had a good think about what would make good horizontal and vertical subjects for the photographs. At visiting some of the sites and doing a quick test shoot, I discounted some of the ideas as either they just did not work or that they failed to express the concept enough.
I used various cameras on this exercise and some of the shots are hand held and others are from a tripod.
I am finding that I’m seeing a tripod as less of a nuisance and more of a compositional tool, allowing me to walk around the subject and allowing me time to examine the subject in the viewfinder.

Horizontal

I went looking for subjects which would express the concept of horizontal either an actual or artificial horizon to the point of view of the viewer.

The first is quite simply a barrier gate, which locks off a piece of road leading down to a lifeboat. The barrier quite literally cuts a horizon across your point of view mainly due to its location and its colour.

D80 Aperture f/14 Shutter Speed 1/40 ISO 160 70mm (35mm equivalent 105mm)Pattern Metering Mode, Auto White Balance, Tripod Mounted.

Barrier Gate

The next was quite obviously an actual horizon; I tried using the rule of thirds to locate the horizon quite far up the frame, as this allowed a good bit of the foreground to be seen and to lead the eye into the frame.

D80 Aperture f/11 Shutter Speed 1/250 ISO 160 70mm (35mm equivalent 105mm)Pattern Metering Mode, Auto White Balance, Hand Held.

Beach

I saw these railings as I was planning to use them as an example of vertical, taken side on. However I changed my mind and photographed them from the side, I tried to get the repeating elements of the horizontal handrails. The horizontal line is also reapeated in the background in the horizon and in the horizontal break in the clouds.

D40x IR Conversion (630nm) Aperture f/10 Shutter Speed 1/125 ISO 200 62mm (35mm equivalent 93mm) Pattern Metering Mode, Preset White Balance (colour corrected in Photoshop) Hand Held.

Stair railings - IR


I quite like the fact that the railings have kept some of their colour and that the corrosion on the railings can be clearly seen.

While walking around the quarter mile in Edinburgh, I came across the front of this building while looking at the side of it. A friend of mine, Rob, was the architect on the building and I originally went along to photograph the cladding that he had put on the side of the building.
I liked the repetition of the screen as the rails/bars run in front of the windows.

D40x IR Conversion (630nm) Aperture f/9 Shutter Speed 1/100 ISO 200 70mm (35mm equivalent 105mm) Pattern Metering Mode, Preset White Balance (colour corrected in Photoshop) Hand Held.

Screen - IR

I like the fact that you get a reflection of part of the building behind and the definition of the cloud.


After looking at the notes, I thought I would add a few extra ideas that I had for horizontal

  • A Gate at wide
  • A Street sign/arrow
  • A bridge from below
  • The bank of a river looking down into the river.

Vertical

Again for this exercise, I went looking for subjects which would express the concept of vertical either by dominating the point of view by size or by having one or more elements pointing straight up/down.

I tried not to orientate the camera into portrait mode for this part of the exercise, although I did for this photograph.
I liked the shape of these metal benches and they were located in a quiet area, so I was able to sit and examine the area through the viewfinder before taking the final photograph. I took this in both colour and IR. I decided on the IR version as it better defined the surface of the benches. The vertical line in this case is created by the benches leading off up into the frame

D40x IR Conversion (630nm) Aperture f/9 Shutter Speed 1/200 ISO 200 22mm (35mm equivalent 33mm) Pattern Metering Mode, Preset White Balance (colour corrected in Photoshop) Hand Held

Metal Benches - IR

This was one of the first photographs I took for this exercise. I found this quite a compelling subject and decided to slowly frame it up. The first photo I took, the flagpole and the top of the church were too small in the frame. I moved closer and took a version where it was better defined in the frame. I went for the vertical line of the flagpole and the repeating horizontal lines of the tops of the columns.

D80 Aperture f/9 Shutter Speed 1/500 ISO 160 300mm (35mm equivalent 450mm) Pattern Metering Mode, Auto White Balance, Tripod Mounted.

Flagpole

I had this idea quite early on, but with a different set of railings in mind, however when I saw the repeated colour of the railings in the trees in the background I decided to go with these railings instead. I went for the straight up and down lines of the railings to represent the vertical lines for this image.

D50 Aperture f/1.8 Shutter Speed 1/1000 ISO 200 50mm (35mm equivalent 75mm) Pattern Metering Mode, Auto White Balance, Hand Held

Railings

I’m not too sure about this last example, it worked better in my mind than it did when I took the photograph. The repeating vertical white blinds of this building were quite eye catching and I found that it lead me to look up and down the building front rather than across it so I used that as the idea of presenting the vertical lines within the frame.

D80 Aperture f/4.5 Shutter Speed 1/800 ISO 160 70mm (35mm equivalent 105mm) Pattern Metering Mode, Auto White Balance, Hand Held

Window blinds

It was not until I had uploaded the photograph that I noted the step shape reflection of the buildings opposite.


Other ideas for vertical included.

  • Stream of water running from a tap – slow shutter speed to indicate movement
  • Row of supporting fence railings – wide aperture to define them from the background
  • Large glass or steel fronted building – wide angle (perhaps)
  • A row of trees in a meadow
  • Either a single or a row of flagpoles
I learned a lot from this exercise, mainly to do with looking at subjects with a different point of view, looking for unusual ways of presenting or breaking up the frame. I also learned that I do not have to rely on the orientation of the camera when I want to portray certain concepts and ideas.
I also learned that a tripod is not a hindrance, but a benefit when composing.

Tuesday 11 May 2010

Infrared Conversion.

I finally bit the bullet and procured a converted DSLR, a D40x with a 630nm conversion on it.

I started doing the horizontal and vertical parts of exercise 18.

Below are three of the "test" shots, converted from the red tinted image to the true colour infrared,


Barrier Gate - IR


Beach - IR


Stair railings - IR

Monday 10 May 2010

Exercise 17

What: The brief of this exercise was to create a still life starting with one object, photographing it and then adding another object, working up to between six and ten photographs where there are multiple objects within the frame
Where: At home
When: In the afternoon.
How: I had been collecting bits and pieces for this exercise for a while, mainly olds and ends which I thought might be suitable. I then set out a sheet of light sensitive holographic paper on a table top, set the camera on a tripod, locked the position off and then attached a shutter release remote to the camera to allow me to fire the shutter without vibrating the camera by touching it with my hands. I experimented with a few setups of objects, but of course having two kittens in the house meant that each setup was pounced upon when ever my back was turned.

After taking the photographs I then used Photoshop to draw the implied shapes on the images and then copied them along with the originals into the blog so that the implied lines and shapes could be seen.

In the first photograph I started with the first object which I placed towards the bottom of the frame as I did not want it to dominate the centre.

Aperture f/11 Shutter Speed 1 second ISO 160 62mm (35mm equivalent 93mm) Pattern Metering Mode, Auto White Balance Tripod Mounted, Remote shutter release.

1


1 plus shapes

I quite like the implied lines from the stone as they direct the eye into the frame. It also stops the stone from feeling too isolated on its own against the background.

In the second image, I added in a simple Allen key as it was a similar colour to the stone, but being a different material it contrasts with the stone. I placed it towards the middle of the frame, the implied line between the stone and the Allen key.

Aperture f/11 Shutter Speed 0.8 seconds ISO 160 62mm (35mm equivalent 93mm) Pattern Metering Mode, Auto White Balance Tripod Mounted, Remote shutter release

2

2 plus shapes
In the third image, the addition of an adaptor kept the implied line through the stone and the Allen Kay but added a second implied line between the stone and the adaptor. The implied lines cross just to the right of the key. This allows the eye to move between the items freely without one of the objects dominating the frame.

Aperture f/11 Shutter Speed 0.6 seconds ISO 160 62mm (35mm equivalent 93mm) Pattern Metering Mode, Auto White Balance Tripod Mounted, Remote shutter release

3


3 plus shapes


At this point I started to realise that with the addition of other objects I would get differing shapes and interactions between the objects.

In the fourth image, I added a metal ring without too much thought. It was only after I had taken the fourth photograph that I realised that it was almost on the straight line running through the stone and the Allen Key.

Aperture f/11 Shutter Speed 0.6 seconds ISO 160 62mm (35mm equivalent 93mm) Pattern Metering Mode, Auto White Balance Tripod Mounted, Remote shutter release

4

4 plus shapes


I started to note that there were a few other implied shapes in the frame; in this case a triangle and a circle could be drawn between the objects. I also noted that the light was reflected in a diamond shape inside the ring itself.

With the addition of a curtain hook and a small amount of adjustment of the objects, the fifth photograph was taken and again I noted that there were multiple implied lines and shapes within the still life setup.

Aperture f/11 Shutter Speed 0.6 seconds ISO 160 62mm (35mm equivalent 93mm) Pattern Metering Mode, Auto White Balance Tripod Mounted, Remote shutter release

5

5 plus shapes


Again I noted a number of triangles, circles and straight lines as well as the occasional odd geometric shape. I could also see the intersections of some of the implied lines in sections where the rule of thirds could be applied.

I randomly added a sixth object, so that I could not influence my design into deliberate forced shapes. The sixth object being a brass screw was placed in the middle bottom of the frame.

Aperture f/11 Shutter Speed 0.5 seconds ISO 160 62mm (35mm equivalent 93mm) Pattern Metering Mode, Auto White Balance Tripod Mounted, Remote shutter release

6

6 plus shapes

I notice that with the addition of this object that one or more of the implied lines and shapes were broken. However some of the implied lines and shapes interacted quite closely together, for example the implied line from the stone to the ring also has one side of an implied triangle shape.

With the addition of the seventh object I realised that the objects required a little reorganisation to stop them becoming too clustered and messy. With the addition of the cotton reel some of the implied geometric shapes which had been lost were re-established.

Aperture f/11 Shutter Speed 0.8 seconds ISO 160 62mm (35mm equivalent 93mm) Pattern Metering Mode, Auto White Balance Tripod Mounted, Remote shutter release

7

7 plus shapes


Again, in the eighth photograph the objects had to be reorganised to prevent them being cluttered and lost. I decided on slight adjustments rather than a complete reorganisation.

Aperture f/11 Shutter Speed 0.6 seconds ISO 160 62mm (35mm equivalent 93mm) Pattern Metering Mode, Auto White Balance Tripod Mounted, Remote shutter release

8

8 plus shapes

I found that this time there were more implied geometric shapes and that some of the objects were obeying the rules of thirds.

With the addition of a ninth object, I was able to note the implied circles, lines and shapes of the objects and that by moving the items around I was able to place them so that they did not look too arranged and that no one object dominated the entire frame.

Aperture f/11 Shutter Speed 0.8 seconds ISO 160 62mm (35mm equivalent 93mm) Pattern Metering Mode, Auto White Balance Tripod Mounted, Remote shutter release

9

9 plus shapes

This time I decided to ignore some of the implied shapes so as not to clutter the diagramming of them. I noted a number of triangles and circles between the objects.

For the tenth and final photograph, I added a small bottle of nail polish in the top right hand part of the frame. Again I noted a number of implied lines, circles, triangles and geometric shapes between the objects.

Aperture f/11 Shutter Speed 0.8 seconds ISO 160 62mm (35mm equivalent 93mm) Pattern Metering Mode, Auto White Balance Tripod Mounted, Remote shutter release

10 items

10 plus shapes


I was surprised by the number of implied lines and shapes between the objects. I had not expected quite so many as I found.

This exercise has certainly taught me about implied lines and shapes within a frame. I was surprised by the number of lines and shapes that I could find in what appeared to be a random selection of objects within a still life. It is certainly something to consider next time I compose a frame, is whether there are any implied line which could affect my composition either adversely or top help improve it or help draw the eye through the frame.

Sunday 9 May 2010

Exercise 16

What: The brief of this exercise was to find at least two normally occurring situations where would be two isolated objects within the frame.
Where: East of Dunbar
When: Just after 16:00
How: I looked around quite hard to find a naturally occurring situation where there would be two isolated objects within the frame. Between the weather and the lack of naturally occurring objects of this type made the brief of this example quite hard. In the end I had to fudge it a bit to get the situations, but at least I found that the two objects in the same frame causes some form of interaction or imbalance.

In this first photograph of two clay ovens, the larger opening of the two is the first thing I noticed, but I then find that my eye is quickly drawn away to the smaller object and then back and forth between the two objects. Having both of the objects within the frame causes an imbalance in the composition, which could be used to emphasis one of the two objects within a frame.
In this image the smaller oven is the stronger more dominant subjects in the frame due to its shape and position within the frame.

f9 1/250 ISO 160 24mm (35mm equivalent 36mm) Pattern Metering Mode, Auto White Balance. Hand held.

Pair of ovens

Pair of ovens - arrow


In the second image, the objects are further apart, but the use of a telephoto lens has flattened the perspective. The lifeboat is the main focal point of the object within the frame due to its bright colours and its position within the frame. The second object in the frame is the large concrete structure which is in the foreground of the frame. Although the structure is the foreground and the eye is drawn to it first, the positioning and colouring of the lifeboat make it a stronger object within the frame.
I do feel that the waves within the frame are a slight distraction but provide a line leading into the frame.

f9 1/250 ISO 160 270mm (35mm equivalent 405mm) Pattern Metering Mode, Auto White Balance. Hand held.

Pillar and Boat

Pillar and Boat - arrow


The last image is a bit of a fudge, as the two objects are split from each other by a clearly defined line of sea. However the two subjects, the houses are the main objects within the frame and again I feel my eye being drawn away from the background and the small lighthouse to the stronger subject of the house which is positioned in the bottom fifth of the frame. Even with the other smaller objects within the frame, the house is still the strongest object within the frame.

f4.8 1/800 ISO 160 116mm (35mm equivalent 174mm) Pattern Metering Mode, Auto White Balance. Hand held.

House and Iighthouse

House and Iighthouse - arrow

This exercise has been quite interesting as I have found that I can again force the perspective and emphasis of a subject within a frame by positioning it and by positioning other objects within the frame to allow the eye to move around and also to make the “main” subject stronger.