Saturday 14 May 2011

Exercise 30

What: The main brief of this exercise was to take similar shots at both normal and high sensitivity
Where: In the house
When: Just before noon
How: The exercise asked for 12 or more photographs of the same subject where the sensitivity of the camera normally known as the ISO was raised after each photograph. I started at ISO 100 and worked my way up.

Previous experience working with camera sensitivity speed meant that I was at least mildly familiar with the use of ISO and how to adjust it within the camera. I knew that changing the ISO would make the camera sensor more sensitive to the amount of light and that doubling the ISO for example for 100 to 200 would double the sensitivity. I also know that it can make it easier or more difficult to take a photograph by adjusting the ISO.
I know what by increasing the sensitivity that there would be a trade off for the sensor and that it would make the image “noisier” and would introduce a film like grain into the image.

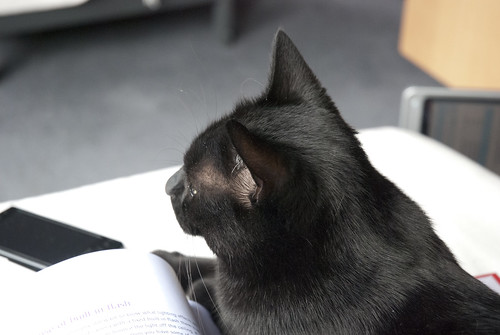
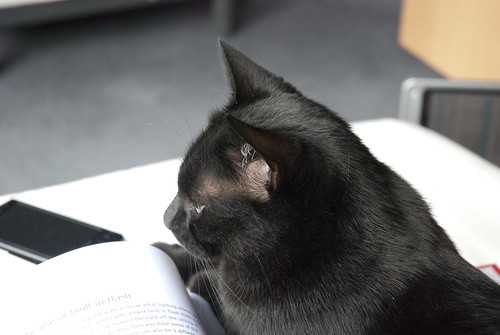
In the end I photographed Louis as he sat to my course notes as they were in a sun beam, I knew that this would allow me to view the dark and light areas of the image to examine it for noise and grain.

I sat and had shot the images adjusting the camera sensitivity by one step each time I took a photograph; I kept the camera at f/4.8 and worked my way up to the highest sensitivity which is H1.0 on a Nikon D80.

D80,Aperture f/4.8 , Shutter Speed 1/10 sec, ISO 100, 55mm (35mm equivalent 82mm), Pattern Metering Mode, Auto White Balance, Hand Held, 18-70 lens

DSC_0059

D80,Aperture f/4.8 , Shutter Speed 1/15 sec, ISO 125, 55mm (35mm equivalent 82mm), Pattern Metering Mode, Auto White Balance, Hand Held, 18-70 lens

DSC_0060

D80,Aperture f/4.8 , Shutter Speed 1/20 sec, ISO 160, 55mm (35mm equivalent 82mm), Pattern Metering Mode, Auto White Balance, Hand Held, 18-70 lens

DSC_0061

D80,Aperture f/4.8 , Shutter Speed 1/30 sec, ISO 200, 55mm (35mm equivalent 82mm), Pattern Metering Mode, Auto White Balance, Hand Held, 18-70 lens

DSC_0062


D80,Aperture f/4.8 , Shutter Speed 1/45 sec, ISO 250, 55mm (35mm equivalent 82mm), Pattern Metering Mode, Auto White Balance, Hand Held, 18-70 lens

DSC_0063

D80,Aperture f/4.8 , Shutter Speed 1/45 sec, ISO 320, 55mm (35mm equivalent 82mm), Pattern Metering Mode, Auto White Balance, Hand Held, 18-70 lens


DSC_0064

D80,Aperture f/4.8 , Shutter Speed 1/60 sec, ISO 400, 55mm (35mm equivalent 82mm), Pattern Metering Mode, Auto White Balance, Hand Held, 18-70 lens

DSC_0065

D80,Aperture f/4.8 , Shutter Speed 1/90 sec, ISO 500, 55mm (35mm equivalent 82mm), Pattern Metering Mode, Auto White Balance, Hand Held, 18-70 lens

DSC_0066

D80,Aperture f/4.8 , Shutter Speed 1/125 sec, ISO 640, 55mm (35mm equivalent 82mm), Pattern Metering Mode, Auto White Balance, Hand Held, 18-70 lens

DSC_0067

D80,Aperture f/4.8 , Shutter Speed 1/125 sec, ISO 800, 55mm (35mm equivalent 82mm), Pattern Metering Mode, Auto White Balance, Hand Held, 18-70 lens

DSC_0068

D80,Aperture f/4.8 , Shutter Speed 1/180 sec, ISO 1000, 55mm (35mm equivalent 82mm), Pattern Metering Mode, Auto White Balance, Hand Held, 18-70 lens

DSC_0069

D80,Aperture f/4.8 , Shutter Speed 1/180 sec, ISO 1250, 55mm (35mm equivalent 82mm), Pattern Metering Mode, Auto White Balance, Hand Held, 18-70 lens

DSC_0070

D80,Aperture f/4.8 , Shutter Speed 1/250 sec, ISO 1600, 55mm (35mm equivalent 82mm), Pattern Metering Mode, Auto White Balance, Hand Held, 18-70 lens

DSC_0071

D80,Aperture f/4.8 , Shutter Speed 1/350 sec, ISO 2000, 55mm (35mm equivalent 82mm), Pattern Metering Mode, Auto White Balance, Hand Held, 18-70 lens

DSC_0072

D80,Aperture f/4.8 , Shutter Speed 1/250 sec, ISO 2500, 55mm (35mm equivalent 82mm), Pattern Metering Mode, Auto White Balance, Hand Held, 18-70 lens

DSC_0073

D80,Aperture f/4.8 , Shutter Speed 1/350 sec, ISO 3200, 55mm (35mm equivalent 82mm), Pattern Metering Mode, Auto White Balance, Hand Held, 18-70 lens

DSC_0074


Straight away I noted that the shutter speed increased as the camera sensitivity was increased although not always at the same step as the ISO did not increase 100-200-400-800 but rather in part steps 100-125-160, etc. I knew that the highest ISO will have a lot of noise and grain.

I have learned that there is a trade off between noise and sensitivity. This is another tool to use when photographing a subject as in some cases it may be necessary to increase the sensitivity knowing that noise will appear but that the image will not be ruined by the noise being present.

Personally I am not a great fan of noise and that in some cases it may be better to support the camera with a tripod rather than increased the sensitivity of the camera to capture an image. However I have also learned that noise is inevitable with increased sensitivity and sometimes the introduction of grain may help the overall composition, a la Film Noir.

Assignment 3 - Reshoots

After a telephone discussion with the tutor I have been looking at reshooting several of the images again as he said that the images were too flat or that although the satisifed the basic brief the images were boring and lacked interest.

I have almost completed the reshoots and only have one more image to complete.

Saturday 7 May 2011

Exercise 29

What: The main brief of this exercise was to experiment with measuring exposure. Where: Various locations
When: Various times of the day in varying lighting conditions
How: First of all the exercise asked for between four and six photographs which were deliberately lighter or darker than average and say why the photographs were chosen.

The second part of the exercise was to take five or six different photographs of any subject by for each photograph make five exposures arranged around what is the best exposure. The first should be one stop darker, the second half a stop darker, the third the average exposure, the fourth one stop lighter and the fifth one stop lighter.

I expected at the start of this exercise that I would find one or two of the exposures to be the preferred exposure of the set. One of the first things I had to do was set my camera up so that I could adjust the exposure by one half stop and one full stop at a simple movement, as the camera had been set up to bracket and one third of a stop.

Deliberately Lighter or Darker

While I was setting up a bracketed shoot I started to examine the light on this glass globe. I really wanted to capture the way that the light was just passing through it and how bright the colours were within the globe; I deliberately made this photograph lighter by making it two stops lighter than the measured exposure.

D80,Aperture f/8, Shutter Speed 1/750 sec, ISO 1250, 105mm (35mm equivalent 157mm), Pattern Metering Mode, Auto White Balance, Tripod Mounted, 105mm lens, light from the left and of the camera.

Glass globe two stops over


As I was looking around for objects to photograph I came across this smashed egg. It was from a pigeon nest which had been raided by a magpie and the egg smashed for food. I just liked the gentle shape of the egg and the colour of it as it had been sitting there for a few days and was being bleached by the sun. I set the exposure to be one half of a stop lighter than the measured exposure

D80,Aperture f/16, Shutter Speed 1/350 sec, ISO 320, 105mm (35mm equivalent 157mm), Pattern Metering Mode, Auto White Balance, Tripod Mounted, 105mm lens, Light high in the sky and almost directly above the camera.

shell half a stop over

It was while looking up at the roof that I started to think about the light and the colour of the lampshade. I then deliberately set the camera to be one stop lighter as I did not want the roof to be too washed out and insolate the lamp completely.

D80,Aperture f/4, Shutter Speed 1/250 sec, ISO 800, 105mm (35mm equivalent 157mm), Pattern Metering Mode, Auto White Balance, Hand Held, 105mm lens.

Lamp one stop over

I wanted to take at least one darker exposure and settled on trying to photograph Louis where I could get one image of him where the darker than measured exposure would be suitable and would be what I wanted. In this case I really wanted to get his dark colour but at the same time capture the texture of his fur as well being able to define him against a background where he would not merge into a black blob.

D80,Aperture f/10, Shutter Speed 1/20 sec, ISO 1000, 70mm (35mm equivalent 105mm), Pattern Metering Mode, Auto White Balance, Tripod Mounted, 18-70mm lens, Light from the right of the camera.


Louis one stop under

While I was out in Edinburgh I stopped and took this image of St, Giles. I wanted to capture the sky as well as the building so I deliberately went for one stop darker than the measured exposure.

D80,Aperture f/10, Shutter Speed 1/800 sec, ISO 500, 27mm (35mm equivalent 40mm), Pattern Metering Mode, Daylight White Balance, Hand Held, 18-70mm lens.

St Giles one stop under


Bracketing.

In each of the following set of images, they have been arranged with the one stop darker on the far left and then arranged in the set leading to the one stop lighter at the far right, with the average measured exposure in the middle


Smokey

I wanted to see what would happen to a mid grey when it was bracketed. In this case I used Smokey who is a mid value of grey (around 6 or 7 on the grey scale) I was surpised to find that I liked the one half stop lighter image as it defined his head better against the deep black and the white was not too blown out.

Smokey bracketed

Still Life

I arranged this collection of objects outside as I wanted to see what would happen to the shiny metal object against the white egg and the sisal cat toy. I also wanted to see what would happen to the secondary colour of green when it was bracketed.

Still life bracketed

In the end I like the one half stop darker exposure as none of the objects neither are too dark nor are the whites blown out and over defined.

Sword Hilt

Here I placed the sword hilt in the direct line of sunlight and measured against the upper part of the hilt. After examining the final selection I prefer the measured exposure as it balances out the dark and light elements together.

Sword Hilt bracket

Black Bag

Again I placed this roll of black bags into direct sunlight and shot the bracket selection of images. I really wanted to see what a dark object would behave like in direct sunlight and then bracketed, as I expected it to be poorly defined up into the one half stop lighter exposure. I was really surprised to see how quickly the bags lost their total black definition and you could see the separate parts of the roll, however the only exposure that I like is the one stop darker exposure as I feel that it is the definitive exposure for this object.

Black Bag bracketed

Yellow and Red

As I was finishing up I looked over at this cable and decided that I wanted to see what happens to the primary colours when bracketed. I was wondering if the colours all differed by the same degree of brightness in each exposure or if the brightness would change individually.

Yello cable bracketed

Again I like the one half stop darker exposure as I think it defines the colours of the cable at that moment in time.

This exercise has taught me that I should also think about perhaps either bracketing an exposure so that I can compensate for difficult situations where the measurement of the exposure by the camera may cause a problem. It has also taught me to think about using over and under exposure to create a feeling within an image, by either using high key or low key exposures or slightly adjusting the exposure to create a slightly darker or lighter image .