Where: Various Locations
When: All times of the day, sunny, rain and dull weather.
How: The first two parts of the exercise were quite straight forward, the photographs in the study guide show flowing lines which lead and flow and create a tension within the image itself.
The turning of the matador as he sweeps the cape out the way of the bull, while the bull itself moves deeper into the frame as it charges past the matador.
The farmer in the second image is quite static while the movement of the horses towards the viewer guides the eye back into the frame and back to the farmer. The slight tilt in the horizon magnified by the foreground which tilts and curves helps to create the tension within the image and to keep the eye moving.
The three images I chose also demonstrate implied lines and these I have marked with an arrow.
Implied Line – Drop and Curve
D80,Aperture f/14.0, Shutter Speed 1/160 sec, ISO 250, 105mm (35mm equivalent 157mm), Pattern Metering Mode, Auto White Balance, Tripod Mounted.
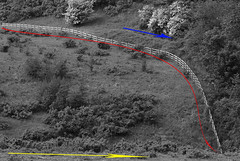
I quite like the curved line that the fence creates as it crosses the frame and the drops off to the right hand corner. The foreshortening caused by the telephoto lens flattens the fence into background making at almost 2 dimensional.
Implied Line – Off to Left
D80,Aperture f/22.0, Shutter Speed 1/25 sec, ISO 100, 11mm (35mm equivalent 16mm), Pattern Metering Mode, Auto White Balance, Tripod Mounted.
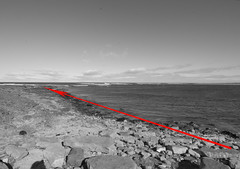
The line of the stones on the beach effectively act as an implied line, moving off into the frame. This is such a simple example of an implied line that I missed it the first time. It was only when examining the image that I saw this implied line on the beach made out of the stones.
Implied Line- Curved Rotation
D80,Aperture f/4.5, Shutter Speed 1/60 sec, ISO 500, 105mm (35mm equivalent 157mm), Pattern Metering Mode, Auto White Balance, Tripod Mounted.
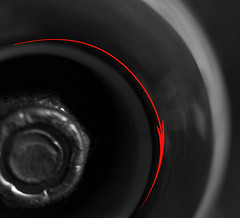
The blurred text on the spinning wheel indicates movement and also implies the directionality of the wheel. This implies a curved line within the movement.
The final part of the exercise I found quite difficult, as I believe I was over analysing the exercise. This combined with being housebound meant that I struggled to find examples of eye lines and extension/leading lines. However I finally overcame this and planned four photographs;
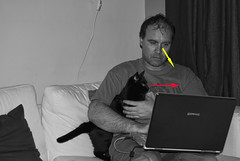
1. Looking at book. The main plan of this photograph was to create an eye line with me looking down reading a book. After sketching the idea, I then setup a camera on the tripod and using a computer controlled timer (DIYPhotobits camera control) I was able to take a number of photographs and then choose the one which demonstrated the eye line the strongest, the rest of the photographs either were badly framed or I was not looking at the book.
I also like the idea that the cat has a different eye line within the same frame.
Yes, I really am that horrible colour just now!
D80,Aperture f/5.6, Shutter Speed 1/125 sec, ISO 125, 52mm (35mm equivalent 78mm), Pattern Metering Mode, Auto White Balance, Tripod Mounted.

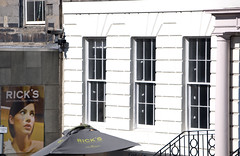
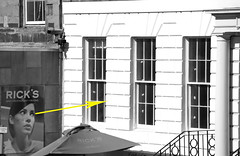
2. Ricks Bar. I noticed this sign out of the corner of my eye as I passed the top of the street that the bar is on. At a certain position, the eyes on the poster were no longer just gazing into space, but were in fact studying the windows of the empty office above it. I took a photograph from a number of positions, but I was happiest with one I took from halfway up a fight of steps across the street. I preferred the framing and the eye line of this photograph. I quite enjoyed capturing this image.
D80,Aperture f/10, Shutter Speed 1/320 sec, ISO 125, 155mm (35mm equivalent 232mm), Pattern Metering Mode, Auto White Balance, Hand Held.
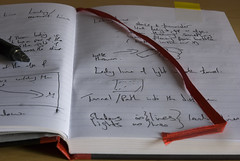
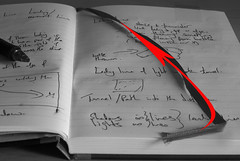
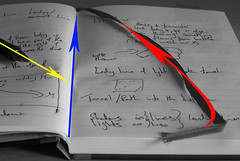
3. Ribbon on book. It was while I was making sketches and notes in my daybook that I realised that the ribbon could be used to create an extension of a line and an line that points. I setup the camera on a tripod and shot this image as the book was sitting open on a table top. I wanted a reasonable close image of the ribbon, so I decided not to capture the whole page of the book, but to get in as close as possible with my framing without losing the knowledge that it was a book.
D80,Aperture f/16, Shutter Speed 0.4 sec, ISO 500, 70mm (35mm equivalent 105mm), Pattern Metering Mode, Auto White Balance, Tripod Mounted.
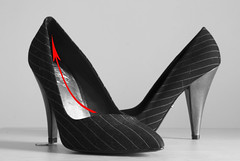
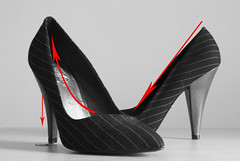
4. Shoes. I noticed a similar photograph in one of my photography books and I decided I would like to make my own homage to the photograph as I felt that it had a number of sweeping lines which created a tension within the image and that guided the eye around the scene. In this case the eye is guided up the shoes by the extension of the line from the curved front of the shoe and also by the red lines on the pattern of the shoe and eventually down to the coin.
D80,Aperture f/16, Shutter Speed 2.5 sec, ISO 500, 48mm (35mm equivalent 72mm), Pattern Metering Mode, Auto White Balance, Tripod Mounted.

I have learned a lot in this exercise, first of all that I should not over analyse the exercise because if I do then I will never complete the exercise or the course. I have learned to break down the ideas into simple guideline and then to work up from there.
I have earned the use of eye-lines in composition, and that they can be used to either guide the viewers’ eye or to help the viewer see the smaller parts of the composition. I have also learned that there are implied lines in almost all of my images and that they must be considered during composition as they have an effect on how an image is viewer and how the viewer eye can be drawn away from the subject instead of towards the subject.
I have learned that lines can be used to emphasis a small part within the frame by using a line to directly point to it or by guiding the eye along the extension of a line.
I have learned about lines and how by creating tension within a frame by using a line then the dynamic tension of the line will move the viewers eye back onto the frame to see more.