Edinburgh’s Photographers: D O Hill and R Adamson, an Edinburgh University open learning course taken by Roddy Simpson. The course started in the learning centre in the middle of Edinburgh Castle before a walking tour of some of the locations in which Hill and Adamson took some of these photographs.
The course summary is that in 1840s Edinburgh the unlikely partnership of David Octavius Hill and Robert Adamson produced photographs which have been admired ever since as among the greatest achievements of photography. The course looked at the reasons for the success of the partnership and the images they made and how these were influenced by the Edinburgh in which they lived.
David Octavius Hill was a well established landscape and portrait painter in the Victorian period before he was persuaded by his friend the physicist and philosopher David Brewster to meet with Robert Adamson at Adamson’s studio in Rock house of Calton hill. Brewster moved within the enlightened circles of Edinburgh's society and was a member of the “Dilettanti club” a varied group of individuals comprising amongst others poets, engineers, painters, authors, advocates and ministers of the cloth which met in the old town section of Edinburgh.
Robert Adamson studied at St. Andrews and was a protégé of David Brewster; however it was Roberts’s older brother John Adamson who taught him all about the Calotype process. Robert Adamson who suffered from long term ill health arrived in Edinburgh with the full intention of becoming the first Calotypist photographer in Edinburgh. Edinburgh had already welcomed daguerreotypists who were already working amongst the rooftops of the New Town. Adamson used his innate skills to perfect on the studies and work of others and used those new found skills to further the progress of Calotype photography. It was said that Adamson became so skilled and knowledable in the process that he knew more about the process than any other photographer.
This circle that both men moved within was one of the highlights in the upheaval of society within Scotland in the 1800s. Due to the highland clearances, land reforms, drought, the potato famine and the industrial revolution, for the first time there were more people in cities than in the towns and villages of Scotland. The city of Edinburgh needed to expand beyond its limited borders of the Old town to meet the population requirements. To this end the New town was created; once the New town was completed there was a movement of the moneyed gentry and the educated classes from the Old town to the New town. While the old town was left behind, groups like the "Dilettanti club" still met within the old town boundaries and still used the old town as a reference for the city.
This unlikely meeting of artist with technician was to be one of the highlights of Victorian photography; Adamson as the technician was the constant driving force forwarding the development of photography and using his innate knowledge developed tried and tested techniques which other photographers at the time could only guess of. Adamson’s’ skills were tempered by Hills skills as an artist; it was Hill who considered photography as a form of art and he advised on composition and placement based on his artists eye which made the partnership successful. Hill used Henry Raeburn’s composition style of portraiture in photography and composed the photographic portraits concentrating mainly on the subjects face and hands.
This is of course is not to say that both men did not enjoy each other’s company; Hill was already a widower and he moved himself and his young daughter to join Adamson at Rock House. This partnership at Rock house allowed both men to practice in the art of photography by photographing their social circle and creating records for history which documented the destruction of parts of old Edinburgh to make way for the new.
It was during this time of social upheaval that the Free Church of Scotland was formed; this progressive movement that both Hill and Adamson supported broke away from the main protestant church, the ministers turning their back on their manses and the stipend that the parishes provided. Hill and Adamson used photography to record groupings of individuals at Rock House so that Hill could later use them to paint the “disruption” painting depicting the signing of the declaration of the formation of the Free Church of Scotland. The plan was for Hill to finish the painting in two to three years however it took Hill so long (23 years) to complete the actual painting that certain individuals were painted a lot older than when their original photograph was taken as well as individuals who were not even present at the event.
It is through Hill and Adamson’s’ detailed work that we can see the development of the Nor Loch part of the Princess Street Gardens location to include both the Scott Monument and the creation of the Waverly station as the main rail link between Berwick upon tweed and the West Coast of Scotland. They recorded the destruction of Mary of Guilders Trinity College Church, the orphan hospital and Lady Glenorochy’s chapel on the mound to make way for the building of Waverly Station while at the same time they recorded the building of the Scott monument as it grew out of the raw earth of Princes Street gardens. They also recorded the building of the National gallery which showed the rapid development of the area. What is rare indeed is that the photographs taken by Hill and Adamson showed the stone masons and builders at work; for the first time these people were the subject of photographic recording.
Hill and Adamson also recorded the erection of the Political Martyrs monument in the Old Calton Hill cemetery; this monument was dedicated to the five men who were imprisoned for campaigning for Parliamentary reform and was being erected at the same time as the Scott Monument.
Victorian society had a principle of personal responsibility and self improvement. As members of the Free Church, Hill and Adamson were concerned about the working class people in the Old Town. It was believed that that society within the city had become unsuitable and there was too much drinking and immoral behaviour. Hill and Adamson turned their eyes to the fisher people of Newhaven. This small group became the model social structure of both men; these self sustaining and self sacrificing men and women who did not dip into the social excess of their peers in the old town became the messengers for a as a contented and relaxed society. Their work t can be considered as the first photo essay and comment on social structure, if not the first photo essay per say. Hill and Adamson considered these sailors and fisher folk, who voluntarily paid some of their earnings into a common pot to be distributed amongst the communities poor and needy to be the pinnacle of the Free Church’s teachings and their record of these individuals shows exceptional skill as well as a small and telling window on the personalities of their subjects. This can be seen in their portrait of Elizabeth Johnstone Hall. This photograph shows exceptional use of lines within the composition, on the fish basket and on the dress of Ms Johnstone Hall as well as control of light.
Personally I enjoyed this course as I have just discovered the work of Hill and Adamson. I was surprised to find Scottish photographers amongst the pioneers of photography. As I viewed the compositions I was reminded of the lessons I have learned in this section of the Art of Photography course
Saturday, 28 August 2010

Tuesday, 24 August 2010
Further Learning - Edin. Uni Open Learning - Magnum Photography: A Critical History
I was given the opportunity to attend a one day open learning course given by Edinburgh University. The course was lead by a tutor who in this case was Tom Allberson; The course was called Magnum Photography : A Critical History and was on the Magnum photographers and their position and influences.
There were a couple of book which were required reading for this one day course.
Photography a short introduction - Steve Edwards
Magnum Photos – Thames and Hudson
As stated in another part of this blog I started to read “Photography a very short introduction” as it was required reading. The book quickly covers photographic history, the politics of observation and then goes on into photographic theory and concepts; including compositional structure and the differing types of photography concentrating mainly on the difference between art photography and documentary photography. I found that the book was a small handy size and that I could stick it in a jacket pocket and read it when I had the time as the chapters were short and simple. At the heart of the chapter on composition within the book were the short introductions to ideas like “the camera space” which considers the composition and use of empty space; this concepts then drew on perspective within composition and was very clear as it clearly defined the differing styles of perspective composition which until now I had never considered. The book also quickly covers the concepts and ideas of framing and narrative again all within the confines of art and documentary photography.
Magnum Photos is a collection of 80 photographs from a number of Magnum Photographers, the book is simply set out with a short précis on the photographer on the left hand page and on the facing (right hand) page, a photograph from that particular photographer. I was able to quickly flick through the book and when I came across an interesting photograph I would examine the image and then read about the photographer. I could see a number of differing styles within the world of photojournalism and looking at the images I can see the progress and changes in the method and style of photojournalism over the years from the beginning of Magnum to the current day. I was surprised to find that Henri Cartier Bresson was a not only one of the founding members but one of the guiding hands within Magnum. Up until the course I had not realised his scope of influence and I had never really considered Cartier Bresson neither as War photographer nor as Photojournalist and his membership came as quite a revelation. I did find a few members of the Magnum stable as a bit hit or miss and that they were either universally liked or disliked by the entire class.
The course itself was a single day’s course which intended to cover the history of the Magnum cooperative, and provide ideas on photographic theory and a sketch of Magnum and its central role in photographic culture over the last 60 years. The course had an in depth look at the questions of documentary and art photography considers photographs of conflict, commerce, loss and leisure and asked what gives these powerful photographs their meaning and importance.
The course content covered quite a bit of ground,
It started with the post WWII establishment of the Magnum photographic agency and the diversity of styles employed by its members and then went onto the birth of photojournalism and determining the meaning and significance and aspect of some iconic images from these photographers. It also covered how photojournalism presents conflict, commerce, humanism and the representation of difference. After the course was finished I sat and considered what I had been taught; I certainly had a clear understanding of the history and importance of the Magnum agency, its ongoing internal debates, its’ influence within a cultural and political context and the direction that the Magnum agency is now engaged in. I became aware of the styles used by its members and I have started to develop some key ideas which help in interpreting photographs.
I have a couple of questions after the course and I have emailed these off to the tutor who was taking the class.
1. Did the negative public feeling for the Vietnam War influence the style and subjects of the photos taken by the Magnum photographers and did the books published by these photographers have an influence on public feeling too.
2. Why was there very little photojournalism in the same vein as the Vietnam images and books during the Korean War? Was this due to the political situation in America at the time - mainly McCarthyism and a fear of communism?
3. If so was this due to the Korean War being seen as a war of Free vs. Communism and therefore a worthwhile war while the Vietnam War was seen mainly was a war of colonialism?
4. After WWI there was a rise in humanism which was particularly felt in Germany, is there any particular reason why “Humanism disappeared” and was only rediscovered after WWII?
5. With the current rise in “Citizen Journalism” and the rights grab by the publishers like the BBC, etc, is it not time that Magnum raised their voice regarding the situation, or does Magnum consider Citizen journalism a fad?
Hopefully Tom will provide some further information, during the course he handed out a number of A4 sheets with further reading on them. I’m happy to provide a scanned copy if required by anyone.
There were a couple of book which were required reading for this one day course.
Photography a short introduction - Steve Edwards
Magnum Photos – Thames and Hudson
As stated in another part of this blog I started to read “Photography a very short introduction” as it was required reading. The book quickly covers photographic history, the politics of observation and then goes on into photographic theory and concepts; including compositional structure and the differing types of photography concentrating mainly on the difference between art photography and documentary photography. I found that the book was a small handy size and that I could stick it in a jacket pocket and read it when I had the time as the chapters were short and simple. At the heart of the chapter on composition within the book were the short introductions to ideas like “the camera space” which considers the composition and use of empty space; this concepts then drew on perspective within composition and was very clear as it clearly defined the differing styles of perspective composition which until now I had never considered. The book also quickly covers the concepts and ideas of framing and narrative again all within the confines of art and documentary photography.
Magnum Photos is a collection of 80 photographs from a number of Magnum Photographers, the book is simply set out with a short précis on the photographer on the left hand page and on the facing (right hand) page, a photograph from that particular photographer. I was able to quickly flick through the book and when I came across an interesting photograph I would examine the image and then read about the photographer. I could see a number of differing styles within the world of photojournalism and looking at the images I can see the progress and changes in the method and style of photojournalism over the years from the beginning of Magnum to the current day. I was surprised to find that Henri Cartier Bresson was a not only one of the founding members but one of the guiding hands within Magnum. Up until the course I had not realised his scope of influence and I had never really considered Cartier Bresson neither as War photographer nor as Photojournalist and his membership came as quite a revelation. I did find a few members of the Magnum stable as a bit hit or miss and that they were either universally liked or disliked by the entire class.
The course itself was a single day’s course which intended to cover the history of the Magnum cooperative, and provide ideas on photographic theory and a sketch of Magnum and its central role in photographic culture over the last 60 years. The course had an in depth look at the questions of documentary and art photography considers photographs of conflict, commerce, loss and leisure and asked what gives these powerful photographs their meaning and importance.
The course content covered quite a bit of ground,
It started with the post WWII establishment of the Magnum photographic agency and the diversity of styles employed by its members and then went onto the birth of photojournalism and determining the meaning and significance and aspect of some iconic images from these photographers. It also covered how photojournalism presents conflict, commerce, humanism and the representation of difference. After the course was finished I sat and considered what I had been taught; I certainly had a clear understanding of the history and importance of the Magnum agency, its ongoing internal debates, its’ influence within a cultural and political context and the direction that the Magnum agency is now engaged in. I became aware of the styles used by its members and I have started to develop some key ideas which help in interpreting photographs.
I have a couple of questions after the course and I have emailed these off to the tutor who was taking the class.
1. Did the negative public feeling for the Vietnam War influence the style and subjects of the photos taken by the Magnum photographers and did the books published by these photographers have an influence on public feeling too.
2. Why was there very little photojournalism in the same vein as the Vietnam images and books during the Korean War? Was this due to the political situation in America at the time - mainly McCarthyism and a fear of communism?
3. If so was this due to the Korean War being seen as a war of Free vs. Communism and therefore a worthwhile war while the Vietnam War was seen mainly was a war of colonialism?
4. After WWI there was a rise in humanism which was particularly felt in Germany, is there any particular reason why “Humanism disappeared” and was only rediscovered after WWII?
5. With the current rise in “Citizen Journalism” and the rights grab by the publishers like the BBC, etc, is it not time that Magnum raised their voice regarding the situation, or does Magnum consider Citizen journalism a fad?
Hopefully Tom will provide some further information, during the course he handed out a number of A4 sheets with further reading on them. I’m happy to provide a scanned copy if required by anyone.
Further Reading.
As I was going to be immobile for a while after my surgery, I asked on the Flickr/OCA forum what I should be doing as I was going to be stuck somewhat like a Hitchcock character in “Rear Window”. It was suggested that I watch “The genius of Photography” and read some suggested titles.
Luckily I had been given a copy of the DVD “The Genius of Photography” just a few days before my operation and so far I have watched the first episode fully and part of the second episode.
I have had further success with the books.
Sontag on Photography – Susan Sontag
Ways of Seeing – John Berger
Photo Icons Volume 1 – Taschen
Edward Weston – Taschen
Photography a very short introduction – Steve Edwards
Sontag on Photography is a collection of essays and ideas from Susan Sontag regarding photographic theory, photographers themselves and the photographic way of seeing. Sontag puts for a number of good ideas and theories within the essays. I found them a little unstructured and at times I found that they almost contradicted themselves from chapter to chapter. However the book was very informative and it introduced come new concepts and language of art that I had not understood up until that point. One of the essays considers the work of Edward S Curtis who created a collection of photographs as a record for society on the passing of the ways of life of the Native American, showing that photography was acting both as a method of recording, a statement on the passing of a way of life, a collection of photographs and an artistic statement.
One of the collections of essays I did really enjoy was on the way of seeing and the artists/photographers eye, these essays contain a lot of philosophy and ideas that I now start to think of when I am even considering the basic ideas of composition.
I had started reading “Ways of seeing” in parallel with Sontag on Photography and found that both authors carry the same message regarding the ability to see and think as an artist and as a photographer and that photography should be treated as an art in its own right. I did find that “Ways of seeing” was easier to read as it combined full text chapters with chapters of nothing but photographs and a combination of both. The simple fact that it allows the reader space and time to examine their own concepts and thoughts and to show that art is open to everyone made it a good book that I could dip in and out of when I was able.
Photo Icons Volume 1 contains a small number of iconic photographs which have been picked for their historical and artistic influence in photography. At first flicking through the book I was unaware of the differing styles that the book would show and I was surprised to see that the collection of photographs were each documented fully covering both the photographer, their artistic and historical place and then examining the photograph in question. I especially liked the little side history giving the full life of the photographer and what their main influences were. These small hard back books were surprisingly cheap and very interesting. From looking at these books I bought books on Edward Weston, Edward S Curtis, Karl Blossfedt, Man Ray and Henri Cartier Bresson.
I am particularly fond of the still life work of Edward Weston, his simple monochromatic images of peppers have a striking use of dark and light which reminds me of the paintings of Diego Rivera as they are stunning in their simplicity. His ability to enhance his subject through the use of light is fascinating and his images of shells are almost impossible to describe for their complexity, I feel that his images almost shine with an inner light. The book has a selection of his images and a short life history on Weston himself.
I read “Photography a very short introduction” as it was required reading for a day course in photography that I took a Edinburgh University just last week. The book quickly covers photographic history and then goes on into photographic theory and concepts; including compositional structure and the differing types of photography concentrating mainly on the difference between art photography and documentary photography. I found that the book was a small handy size and that I could stick it in a jacket pocket and read it when I had the time as the chapters were short and simple. The chapter on perspective within composition was very clear and it clearly defined the differing styles of perspective composition which until now I had never considered.
Luckily I had been given a copy of the DVD “The Genius of Photography” just a few days before my operation and so far I have watched the first episode fully and part of the second episode.
I have had further success with the books.
Sontag on Photography – Susan Sontag
Ways of Seeing – John Berger
Photo Icons Volume 1 – Taschen
Edward Weston – Taschen
Photography a very short introduction – Steve Edwards
Sontag on Photography is a collection of essays and ideas from Susan Sontag regarding photographic theory, photographers themselves and the photographic way of seeing. Sontag puts for a number of good ideas and theories within the essays. I found them a little unstructured and at times I found that they almost contradicted themselves from chapter to chapter. However the book was very informative and it introduced come new concepts and language of art that I had not understood up until that point. One of the essays considers the work of Edward S Curtis who created a collection of photographs as a record for society on the passing of the ways of life of the Native American, showing that photography was acting both as a method of recording, a statement on the passing of a way of life, a collection of photographs and an artistic statement.
One of the collections of essays I did really enjoy was on the way of seeing and the artists/photographers eye, these essays contain a lot of philosophy and ideas that I now start to think of when I am even considering the basic ideas of composition.
I had started reading “Ways of seeing” in parallel with Sontag on Photography and found that both authors carry the same message regarding the ability to see and think as an artist and as a photographer and that photography should be treated as an art in its own right. I did find that “Ways of seeing” was easier to read as it combined full text chapters with chapters of nothing but photographs and a combination of both. The simple fact that it allows the reader space and time to examine their own concepts and thoughts and to show that art is open to everyone made it a good book that I could dip in and out of when I was able.
Photo Icons Volume 1 contains a small number of iconic photographs which have been picked for their historical and artistic influence in photography. At first flicking through the book I was unaware of the differing styles that the book would show and I was surprised to see that the collection of photographs were each documented fully covering both the photographer, their artistic and historical place and then examining the photograph in question. I especially liked the little side history giving the full life of the photographer and what their main influences were. These small hard back books were surprisingly cheap and very interesting. From looking at these books I bought books on Edward Weston, Edward S Curtis, Karl Blossfedt, Man Ray and Henri Cartier Bresson.
I am particularly fond of the still life work of Edward Weston, his simple monochromatic images of peppers have a striking use of dark and light which reminds me of the paintings of Diego Rivera as they are stunning in their simplicity. His ability to enhance his subject through the use of light is fascinating and his images of shells are almost impossible to describe for their complexity, I feel that his images almost shine with an inner light. The book has a selection of his images and a short life history on Weston himself.
I read “Photography a very short introduction” as it was required reading for a day course in photography that I took a Edinburgh University just last week. The book quickly covers photographic history and then goes on into photographic theory and concepts; including compositional structure and the differing types of photography concentrating mainly on the difference between art photography and documentary photography. I found that the book was a small handy size and that I could stick it in a jacket pocket and read it when I had the time as the chapters were short and simple. The chapter on perspective within composition was very clear and it clearly defined the differing styles of perspective composition which until now I had never considered.
Monday, 23 August 2010
Exercise 22
What: The brief of this exercise was to examine and produce two sets of triangular compositions, one using real triangles and one using implied triangles.
Where: Various Locations
When: All times of the day, sunny, rain and dull weather.
How: I did find this exercise quite difficult in two ways; the first problem is that I have not regained full mobility and after a surgical procedure I was unable to climb stairs, walk distances, etc. This had an effect in that I could not travel to some of my subjects and when I got there I could not always find a way of obtaining a suitable location or perspective. I found this quite frustrating and at times I was quite concerned that I would be unable to complete this exercise.
The second problem was that I just made a dyslexic mistake and misunderstood the brief of the exercise and made a basic mistake in how I was to photograph using perspective. It was not until I was writing up my notes that I realised what a mistake I had made.
Since starting this part of the course I have started to “see” shapes in all sorts of locations and structures. This has been a real surprise and has made part of these exercises quite fun as I point out shapes and forms.
Real triangles
Brief: Find a subject which is in itself triangular.
I did find this difficult stuck inside as there were not a lot of triangular things that I could get to easily. It was only once that I had gained some mobility that I was able to move about outside. I quickly spotted this triangular shape at the top of a window in a nearby building. It was quite easy to photograph and have it as the main item in the frame.
D80,Aperture f/6.6, Shutter Speed 1/400 sec, ISO 400, 210mm (35mm equivalent 315mm), Pattern Metering Mode, Auto White Balance, Aperture Priority, Hand Held, VR lens.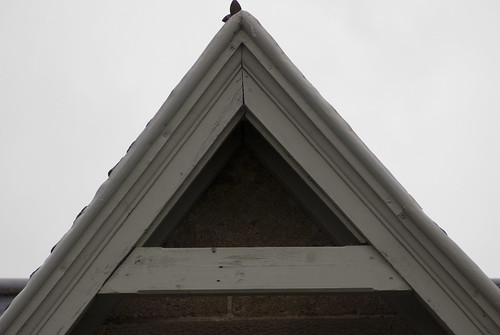
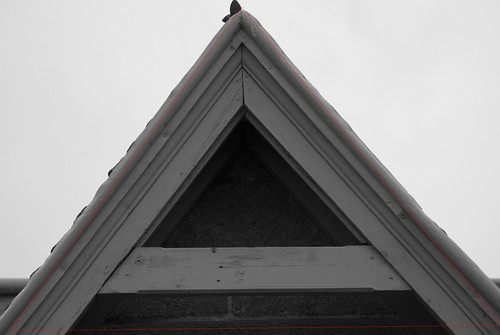
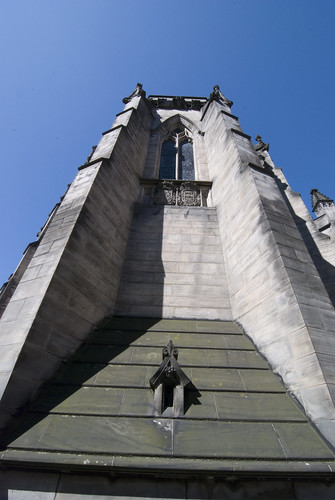
Brief: Make a triangle by perspective (top).
This was quite easy to do, with a wide angle lens it is quite easy to position a subject in such as way that it converges towards the top of the frame.
D80,Aperture f/14.0, Shutter Speed 1/50 sec, ISO 400, 11mm (35mm equivalent 16mm), Pattern Metering Mode, Auto White Balance, Hand Held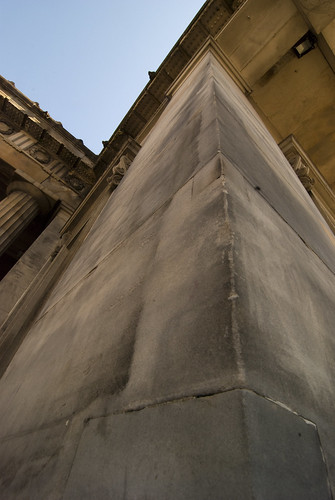
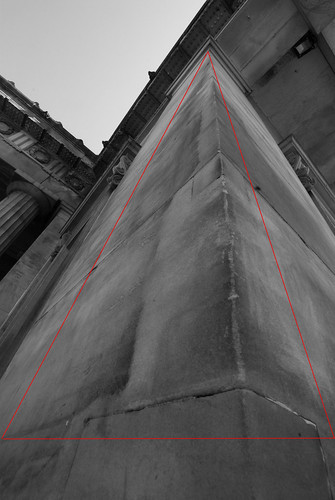
I produced a number of this type of perspective triangle, I have uploaded them into my Flickr pages so that they would also be available to view.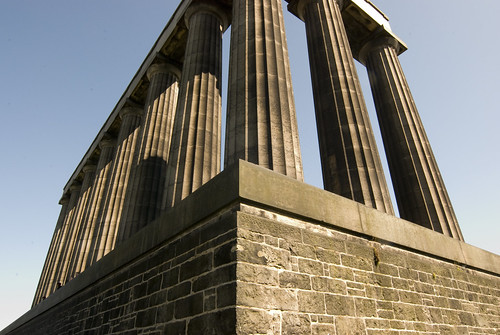
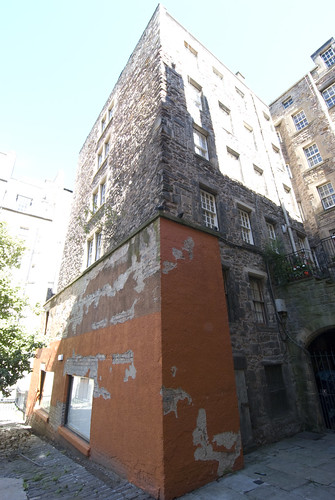
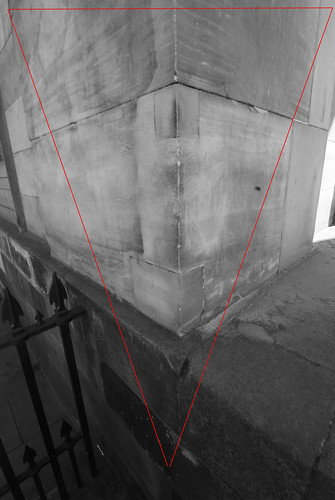
Brief: Make a triangle by perspective (bottom).
This was not quite as easy to do as I thought, as in a lot of the locations I found there was no good way to photograph the subject which would produce a triangle by perspective where it would converge towards the bottom of the frame. This gave me a lot of frustration and it was not until we were making our way back from an unsuccessful shoot of another subject that I managed to take this shot.
D80,Aperture f/14.0, Shutter Speed 1/40 sec, ISO 400, 11mm (35mm equivalent 16mm), Pattern Metering Mode, Auto White Balance, Hand Held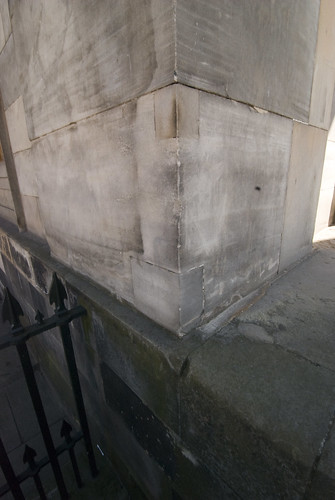
Implied Triangles
Brief: Make a still life arrangement to produce a triangle with the apex at the top
I had a bit of fun with this as I was stuck inside and with limited movement I could take my time and experiment with different styles of still life arrangement. I used almost the same items for this still life arrangement as the next brief where the apex is at the bottom.
D80,Aperture f/29.0, Shutter Speed 1/60 sec, ISO 800, 65mm (35mm equivalent 97mm), Pattern Metering Mode, Auto White Balance, Tripod Mounted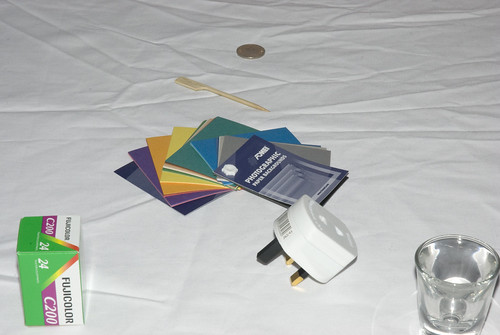
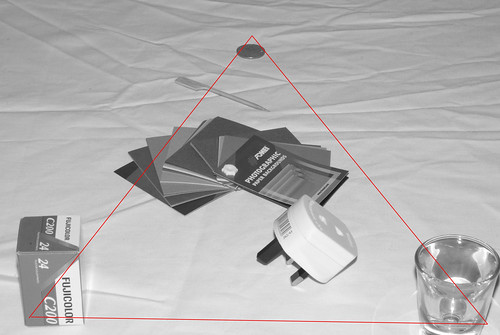
Brief: Make a still life arrangement to produce a triangle with the apex at the bottom.
D80,Aperture f/29.0, Shutter Speed 1/60 sec, ISO 800, 65mm (35mm equivalent 97mm), Pattern Metering Mode, Auto White Balance, Tripod Mounted
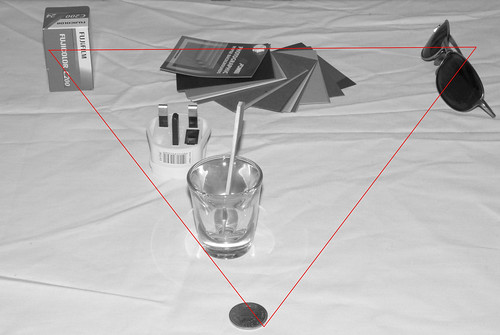
Brief: Arrange three people in a group picture in such a way that either their faces or the lines of their bodies make a triangle.
D80,Aperture f/4.5, Shutter Speed 1/60 sec, ISO 100, 52mm (35mm equivalent 78mm), Pattern Metering Mode, Auto White Balance, Tripod Mounted, Flash Fired.
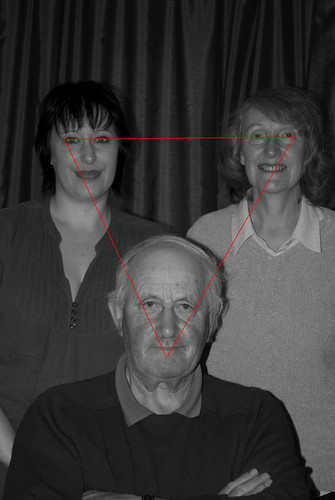
On the whole, although limited in what I could do and shoot I enjoyed the exercise and it has helped me understand triangular perspective and the vanishing point.
It has also helped me understand that triangles and thei use in composition and that they can be of help or hinder a composition.
Monday, 19 July 2010
Exercise 21
What: The brief of this exercise was to first examine the two photographs in the study guide and find and note the implied lines. Then take three recent photographs of my own and perform the same analysis on the photographs. The final part of the exercise was to plant and take two photographs that use eye-line and extensions of lines or lines that point.
Where: Various Locations
When: All times of the day, sunny, rain and dull weather.
How: The first two parts of the exercise were quite straight forward, the photographs in the study guide show flowing lines which lead and flow and create a tension within the image itself.
The turning of the matador as he sweeps the cape out the way of the bull, while the bull itself moves deeper into the frame as it charges past the matador.
The farmer in the second image is quite static while the movement of the horses towards the viewer guides the eye back into the frame and back to the farmer. The slight tilt in the horizon magnified by the foreground which tilts and curves helps to create the tension within the image and to keep the eye moving.
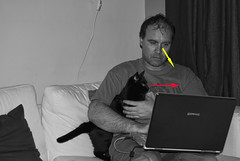
The three images I chose also demonstrate implied lines and these I have marked with an arrow.
Implied Line – Drop and Curve
D80,Aperture f/14.0, Shutter Speed 1/160 sec, ISO 250, 105mm (35mm equivalent 157mm), Pattern Metering Mode, Auto White Balance, Tripod Mounted.
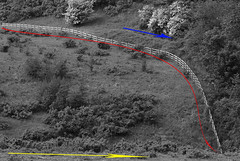
I quite like the curved line that the fence creates as it crosses the frame and the drops off to the right hand corner. The foreshortening caused by the telephoto lens flattens the fence into background making at almost 2 dimensional.
Implied Line – Off to Left
D80,Aperture f/22.0, Shutter Speed 1/25 sec, ISO 100, 11mm (35mm equivalent 16mm), Pattern Metering Mode, Auto White Balance, Tripod Mounted.
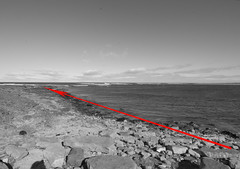
The line of the stones on the beach effectively act as an implied line, moving off into the frame. This is such a simple example of an implied line that I missed it the first time. It was only when examining the image that I saw this implied line on the beach made out of the stones.
Implied Line- Curved Rotation
D80,Aperture f/4.5, Shutter Speed 1/60 sec, ISO 500, 105mm (35mm equivalent 157mm), Pattern Metering Mode, Auto White Balance, Tripod Mounted.
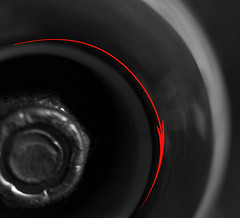
The blurred text on the spinning wheel indicates movement and also implies the directionality of the wheel. This implies a curved line within the movement.
The final part of the exercise I found quite difficult, as I believe I was over analysing the exercise. This combined with being housebound meant that I struggled to find examples of eye lines and extension/leading lines. However I finally overcame this and planned four photographs;
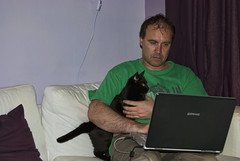
1. Looking at book. The main plan of this photograph was to create an eye line with me looking down reading a book. After sketching the idea, I then setup a camera on the tripod and using a computer controlled timer (DIYPhotobits camera control) I was able to take a number of photographs and then choose the one which demonstrated the eye line the strongest, the rest of the photographs either were badly framed or I was not looking at the book.
I also like the idea that the cat has a different eye line within the same frame.
Yes, I really am that horrible colour just now!
D80,Aperture f/5.6, Shutter Speed 1/125 sec, ISO 125, 52mm (35mm equivalent 78mm), Pattern Metering Mode, Auto White Balance, Tripod Mounted.
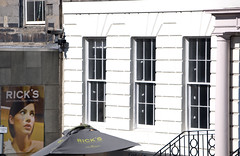
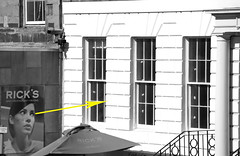
2. Ricks Bar. I noticed this sign out of the corner of my eye as I passed the top of the street that the bar is on. At a certain position, the eyes on the poster were no longer just gazing into space, but were in fact studying the windows of the empty office above it. I took a photograph from a number of positions, but I was happiest with one I took from halfway up a fight of steps across the street. I preferred the framing and the eye line of this photograph. I quite enjoyed capturing this image.
D80,Aperture f/10, Shutter Speed 1/320 sec, ISO 125, 155mm (35mm equivalent 232mm), Pattern Metering Mode, Auto White Balance, Hand Held.
3. Ribbon on book. It was while I was making sketches and notes in my daybook that I realised that the ribbon could be used to create an extension of a line and an line that points. I setup the camera on a tripod and shot this image as the book was sitting open on a table top. I wanted a reasonable close image of the ribbon, so I decided not to capture the whole page of the book, but to get in as close as possible with my framing without losing the knowledge that it was a book.
D80,Aperture f/16, Shutter Speed 0.4 sec, ISO 500, 70mm (35mm equivalent 105mm), Pattern Metering Mode, Auto White Balance, Tripod Mounted.
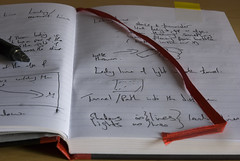
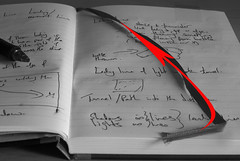
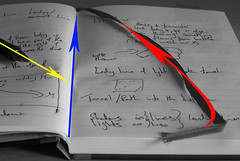
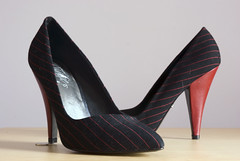
4. Shoes. I noticed a similar photograph in one of my photography books and I decided I would like to make my own homage to the photograph as I felt that it had a number of sweeping lines which created a tension within the image and that guided the eye around the scene. In this case the eye is guided up the shoes by the extension of the line from the curved front of the shoe and also by the red lines on the pattern of the shoe and eventually down to the coin.
D80,Aperture f/16, Shutter Speed 2.5 sec, ISO 500, 48mm (35mm equivalent 72mm), Pattern Metering Mode, Auto White Balance, Tripod Mounted.
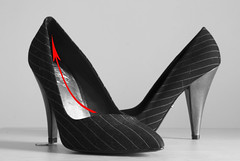
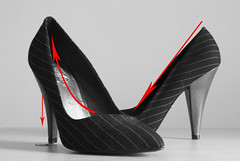
I have learned a lot in this exercise, first of all that I should not over analyse the exercise because if I do then I will never complete the exercise or the course. I have learned to break down the ideas into simple guideline and then to work up from there.
I have earned the use of eye-lines in composition, and that they can be used to either guide the viewers’ eye or to help the viewer see the smaller parts of the composition. I have also learned that there are implied lines in almost all of my images and that they must be considered during composition as they have an effect on how an image is viewer and how the viewer eye can be drawn away from the subject instead of towards the subject.
I have learned that lines can be used to emphasis a small part within the frame by using a line to directly point to it or by guiding the eye along the extension of a line.
I have learned about lines and how by creating tension within a frame by using a line then the dynamic tension of the line will move the viewers eye back onto the frame to see more.
Where: Various Locations
When: All times of the day, sunny, rain and dull weather.
How: The first two parts of the exercise were quite straight forward, the photographs in the study guide show flowing lines which lead and flow and create a tension within the image itself.
The turning of the matador as he sweeps the cape out the way of the bull, while the bull itself moves deeper into the frame as it charges past the matador.
The farmer in the second image is quite static while the movement of the horses towards the viewer guides the eye back into the frame and back to the farmer. The slight tilt in the horizon magnified by the foreground which tilts and curves helps to create the tension within the image and to keep the eye moving.
The three images I chose also demonstrate implied lines and these I have marked with an arrow.
Implied Line – Drop and Curve
D80,Aperture f/14.0, Shutter Speed 1/160 sec, ISO 250, 105mm (35mm equivalent 157mm), Pattern Metering Mode, Auto White Balance, Tripod Mounted.
I quite like the curved line that the fence creates as it crosses the frame and the drops off to the right hand corner. The foreshortening caused by the telephoto lens flattens the fence into background making at almost 2 dimensional.
Implied Line – Off to Left
D80,Aperture f/22.0, Shutter Speed 1/25 sec, ISO 100, 11mm (35mm equivalent 16mm), Pattern Metering Mode, Auto White Balance, Tripod Mounted.
The line of the stones on the beach effectively act as an implied line, moving off into the frame. This is such a simple example of an implied line that I missed it the first time. It was only when examining the image that I saw this implied line on the beach made out of the stones.
Implied Line- Curved Rotation
D80,Aperture f/4.5, Shutter Speed 1/60 sec, ISO 500, 105mm (35mm equivalent 157mm), Pattern Metering Mode, Auto White Balance, Tripod Mounted.
The blurred text on the spinning wheel indicates movement and also implies the directionality of the wheel. This implies a curved line within the movement.
The final part of the exercise I found quite difficult, as I believe I was over analysing the exercise. This combined with being housebound meant that I struggled to find examples of eye lines and extension/leading lines. However I finally overcame this and planned four photographs;
1. Looking at book. The main plan of this photograph was to create an eye line with me looking down reading a book. After sketching the idea, I then setup a camera on the tripod and using a computer controlled timer (DIYPhotobits camera control) I was able to take a number of photographs and then choose the one which demonstrated the eye line the strongest, the rest of the photographs either were badly framed or I was not looking at the book.
I also like the idea that the cat has a different eye line within the same frame.
Yes, I really am that horrible colour just now!
D80,Aperture f/5.6, Shutter Speed 1/125 sec, ISO 125, 52mm (35mm equivalent 78mm), Pattern Metering Mode, Auto White Balance, Tripod Mounted.
2. Ricks Bar. I noticed this sign out of the corner of my eye as I passed the top of the street that the bar is on. At a certain position, the eyes on the poster were no longer just gazing into space, but were in fact studying the windows of the empty office above it. I took a photograph from a number of positions, but I was happiest with one I took from halfway up a fight of steps across the street. I preferred the framing and the eye line of this photograph. I quite enjoyed capturing this image.
D80,Aperture f/10, Shutter Speed 1/320 sec, ISO 125, 155mm (35mm equivalent 232mm), Pattern Metering Mode, Auto White Balance, Hand Held.
3. Ribbon on book. It was while I was making sketches and notes in my daybook that I realised that the ribbon could be used to create an extension of a line and an line that points. I setup the camera on a tripod and shot this image as the book was sitting open on a table top. I wanted a reasonable close image of the ribbon, so I decided not to capture the whole page of the book, but to get in as close as possible with my framing without losing the knowledge that it was a book.
D80,Aperture f/16, Shutter Speed 0.4 sec, ISO 500, 70mm (35mm equivalent 105mm), Pattern Metering Mode, Auto White Balance, Tripod Mounted.
4. Shoes. I noticed a similar photograph in one of my photography books and I decided I would like to make my own homage to the photograph as I felt that it had a number of sweeping lines which created a tension within the image and that guided the eye around the scene. In this case the eye is guided up the shoes by the extension of the line from the curved front of the shoe and also by the red lines on the pattern of the shoe and eventually down to the coin.
D80,Aperture f/16, Shutter Speed 2.5 sec, ISO 500, 48mm (35mm equivalent 72mm), Pattern Metering Mode, Auto White Balance, Tripod Mounted.
I have learned a lot in this exercise, first of all that I should not over analyse the exercise because if I do then I will never complete the exercise or the course. I have learned to break down the ideas into simple guideline and then to work up from there.
I have earned the use of eye-lines in composition, and that they can be used to either guide the viewers’ eye or to help the viewer see the smaller parts of the composition. I have also learned that there are implied lines in almost all of my images and that they must be considered during composition as they have an effect on how an image is viewer and how the viewer eye can be drawn away from the subject instead of towards the subject.
I have learned that lines can be used to emphasis a small part within the frame by using a line to directly point to it or by guiding the eye along the extension of a line.
I have learned about lines and how by creating tension within a frame by using a line then the dynamic tension of the line will move the viewers eye back onto the frame to see more.
Saturday, 3 July 2010
Further Reading –Ian Jeffrey - How to Read a Photograph
I have started this large thick book with some trepidation as it appeared to start with to be a technical tome of a book. However it is a very accessible and practical book. I’m only a small part way through the book however and I have found it to take quite a European stance on photography almost ignoring the early photography being pioneered in American . The style of the book makes it easy to read and which so far has been educational and refreshing.
Some of the photographers so far that I have read about are
- David Octavius Hill & Robert Adamson
These two Scottish Edinburgh based photographers were quite a surprised to me; I had never heard of these photographers before and these two very early pioneers impressed me.
I found their portraits to carry a massive range of contrast and highlights in the colours of their dark monochrome images. The formal posed portraits of both the Edinburgh notables and the fisher folk of Newhaven all carry an intensity within the image, that I feel at times that I am looking at a portrait painted by Rembrandt.
- Wilhelm Von Thoma
What impressed me the most about the work of this German photographer is the range of styles he covered. He moved from formal portraiture, recording for posterity people, to taking war photographs which are open to interpretive analysis.
At the start of the Great War he was recording the formal posed groupings of aristocratic German Pilots and he slowly moved through photographs capturing and recording people and their moments in time , through informal loosely posed portraits to recording the brutality of war both on the landscape and more importantly on people fighting in the war. Unlike the posed formal portraits from the American Civil war and Roger Fentons Crimean war photographs, which records the landscape after the battle (but which I feel ignores the brutality of the battle) ; Von Thoma shows what the war was doing to soldiers, pilots and the landscape, both at the front line and further behind. This style of war photography would really not be seen again until Robert Haeberle and Don McCullins’ photographs from the Vietnam war.
I feel that Von Thoma in his relaxed portraits and front line war images was moving away from a method of just recording that moment in time and opening the photograph up for interpretation for the viewer
- August Sander
On first viewing of Sanders "Herdsman" you may think that this photograph was taken at the latter end of the 20th Century. In fact this modern, interpretive informal portrait was taken in 1913. The posing, colour, contrasts and definition of the image show that Sander had taken his time in creating this photograph. This photograph was just one of the many eye catching photographs that Sander took for his book “Face of our time” which established Sanders’ reputation. The book with its empathic one to one relationships with the viewer caught the attention of the National Socialist authorities seized the books and destroyed the printing plates; they may have interpreted Sanders photographs and book as a satire of their policies. His later work may have been influenced by Beckman and Raderschiedt as his portraiture is in the modernist style of the times and is both impassive and poignant in detail.
- Alexander Rodchenko
Rodchenko was already an establish artist when he took up photography, he was quick to experiment with differing styles and his influence on photography itself is mainly due to his influence on the elements of design. As an illustrator he was already experimenting with photomontage and the skills he learned producing adverts and posters and he used these skills when composing his photographs. He quickly demonstrated his ideas and his Constructionist style of photography in images such as the “Workers Facility Student” where this portraits shows the head and neck of a smiling young man on a divided black and white background. The student portrayed has his had perched on the back of his head and its multiple sided shape frames his face. The students smile frames his mouth repeating the shape of the hat and it subdivides his face. His “Pioneer Girl” its point of view upwards towards the subject is in the European neoclassical style and shows a symmetrical figure almost like a statue. Rodchenko used these elements of design frequently; the repetition of shape, pattern or form and differing angles for point of view. I feel that he was trying to move away from the formal way of taking photographs and experiment with ideas and expressions within his photography.
Sunday, 13 June 2010
Exercise 20
What: The brief of this exercise was to locate and photograph subjects which demonstrated strong curves which emphasised movement and direction.
Where: Various Locations inside and outside
When: All times of the day, sunny, rain and dull weather.
How: I had a good think about what subjects would be good for curves, as I live in an area dominated by late 1950’s early 1960’s architecture which is mainly all strong straight lines everywhere. As in the last few exercises I made a few notes and drawings to get the ideas clear in my head, again on visited some of the sites and photographing some of the ideas either they just did not work or that they failed to express the concept.
I mainly relied on one camera on this exercise and some of the photographs were taken where the camera was handheld as this gave me the freedom of movement and others were tripod mounted to give me the time to compose the image.
Curved Bridge.
D80,Aperture f/4.5, Shutter Speed 1/1600 sec, ISO 250, 62mm (35mm equivalent 93mm), Pattern Metering Mode, Auto White Balance, Tripod Mounted.
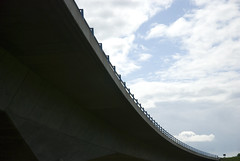
This is a relatively new piece of road built in the last 15 years or so. It actually crosses over an old sheep drover’s road and over the river both of which are in the valley below it. The bridge curves to bring two pieces of road together on either side of the valley and it swoops down and over the point of view from the drovers’ road below.
I decided to reshoot an old photograph that I had taken years ago, when I had first started using a DSLR. I have always liked the abstract curves and colour reflections that this shot creates
Fish in a Tube
D80, Aperture f/5, Shutter Speed 1/40 sec, ISO 500, 56mm (35mm equivalent 84mm),Pattern Metering Mode, Auto White Balance, Hand Held,
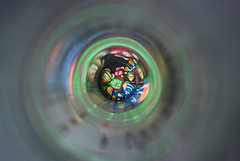
I this I feel the eye is being drawn away from the main subject and into the repeated curved pattern as it moves outwards towards the edge of the frame. This also gives the impression of movement as the light bounces up the inside of the tube. Previously I have used a flash on the outside of the tube to provide even more light, but in this case I just used sunlight filtered in through a window.
In the third shot I decided to go back to “old technology” and I went for the curved grooves on an LP record. I shot this from various positions until I got the light where I wanted it; I wanted the eye to be drawn through the frame following the movement of the groove.
Grooved
D80, Aperture f/3.3, Shutter Speed 1/60 sec, ISO 500, 105mm (35mm equivalent 157mm), Pattern Metering Mode, Auto White Balance, Hand Held
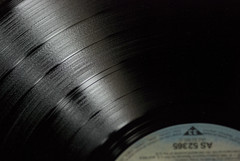
I liked the repetition of the curve and the grooves; and that the eye was drawn long the grooves creating its own movement in the opposite direction to which the record would actually have played.
In the fourth shot, I wanted a curve which also showed quick movement. So I decided on a skateboard wheel.
Wheel
D80, Aperture f4.5, Shutter Speed 1/60 sec, ISO 500, 105mm (35mm equivalent 157mm), Pattern Metering Mode, Auto White Balance, Hand Supported.
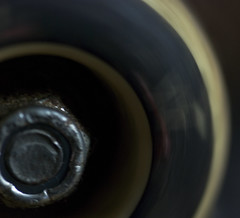
I wanted to use Macro for this image, as I wanted to get as close to the wheel as possible while still showing the movement of the wheel. I cropped off the right hand side of the image as this was just dead space within the composition and was doing nothing for the overall image. I went for a reasonable slow shutter speed to capture the movement of the wheel while at the same time showing the inner and outer curves of the wheel.
I found this quite a hard exercise to do. For some unknown reason I just could not get the compositions right to begin with and I had a hard time coming up with the ideas for the shots.
Overall I liked this exercise as it again forced me to look for something that I would not normally notice and I find now that I’m always looking for shapes, lines and movement where-ever I go.
Where: Various Locations inside and outside
When: All times of the day, sunny, rain and dull weather.
How: I had a good think about what subjects would be good for curves, as I live in an area dominated by late 1950’s early 1960’s architecture which is mainly all strong straight lines everywhere. As in the last few exercises I made a few notes and drawings to get the ideas clear in my head, again on visited some of the sites and photographing some of the ideas either they just did not work or that they failed to express the concept.
I mainly relied on one camera on this exercise and some of the photographs were taken where the camera was handheld as this gave me the freedom of movement and others were tripod mounted to give me the time to compose the image.
Curved Bridge.
D80,Aperture f/4.5, Shutter Speed 1/1600 sec, ISO 250, 62mm (35mm equivalent 93mm), Pattern Metering Mode, Auto White Balance, Tripod Mounted.
This is a relatively new piece of road built in the last 15 years or so. It actually crosses over an old sheep drover’s road and over the river both of which are in the valley below it. The bridge curves to bring two pieces of road together on either side of the valley and it swoops down and over the point of view from the drovers’ road below.
I decided to reshoot an old photograph that I had taken years ago, when I had first started using a DSLR. I have always liked the abstract curves and colour reflections that this shot creates
Fish in a Tube
D80, Aperture f/5, Shutter Speed 1/40 sec, ISO 500, 56mm (35mm equivalent 84mm),Pattern Metering Mode, Auto White Balance, Hand Held,
I this I feel the eye is being drawn away from the main subject and into the repeated curved pattern as it moves outwards towards the edge of the frame. This also gives the impression of movement as the light bounces up the inside of the tube. Previously I have used a flash on the outside of the tube to provide even more light, but in this case I just used sunlight filtered in through a window.
In the third shot I decided to go back to “old technology” and I went for the curved grooves on an LP record. I shot this from various positions until I got the light where I wanted it; I wanted the eye to be drawn through the frame following the movement of the groove.
Grooved
D80, Aperture f/3.3, Shutter Speed 1/60 sec, ISO 500, 105mm (35mm equivalent 157mm), Pattern Metering Mode, Auto White Balance, Hand Held
I liked the repetition of the curve and the grooves; and that the eye was drawn long the grooves creating its own movement in the opposite direction to which the record would actually have played.
In the fourth shot, I wanted a curve which also showed quick movement. So I decided on a skateboard wheel.
Wheel
D80, Aperture f4.5, Shutter Speed 1/60 sec, ISO 500, 105mm (35mm equivalent 157mm), Pattern Metering Mode, Auto White Balance, Hand Supported.
I wanted to use Macro for this image, as I wanted to get as close to the wheel as possible while still showing the movement of the wheel. I cropped off the right hand side of the image as this was just dead space within the composition and was doing nothing for the overall image. I went for a reasonable slow shutter speed to capture the movement of the wheel while at the same time showing the inner and outer curves of the wheel.
I found this quite a hard exercise to do. For some unknown reason I just could not get the compositions right to begin with and I had a hard time coming up with the ideas for the shots.
Overall I liked this exercise as it again forced me to look for something that I would not normally notice and I find now that I’m always looking for shapes, lines and movement where-ever I go.
Subscribe to:
Posts (Atom)