Thursday 14 July 2011

Exercise 36 Tungsten and Fluorescent Lighting – Parts One and Two

Exercise 36 Tungsten and Fluorescent lighting – Part One

What: The main brief of this exercise was to take three photographs of the same subject where the interior and exterior light levels would be the same and where the interior was light with a tungsten bulb. The brief then asked for measurements of different parts of the room for light levels and exposure details and then asked for the three photographs to be taken where the White Balance was changed at each exposure from Auto to Daylight to Tungsten.
Where: In a main room of the house
When: Just as the sun was starting to set and I decided that the light levels were the same.
How: The first thing I did was set my camera ISO to 100 as instructed in the exercise and after setting up the lamp I moved around the room measure the light levels and noting the exposure details at maximum and minimum aperture.

I also looked out of the window and then back at the bulb to see how the colours would be affected by the differing light. I found that looking back into the room that the bulb was a very deep warm yellow, almost orange hue and that it was very bright. Looking back out of the window I noted that the sky was a cold blue hue and that the shadows in the sky were dim and again cold.

What I found first of all was that at ISO 100 with a 11-16mm lens that it was almost impossible to achieve a suitable situation where I could shoot in those conditions at hand held speed. It would be theoretically possible to hand hold at a higher ISO or where the shutter speed was a higher value than the focal length of the lens, but it would still be a bit precarious. On the whole at ISO 100 a tripod mount is recommended.

Looking directly at the lamp an aperture of f/2.8 had an exposure speed of 1/45 of a second
Looking directly at the lamp an aperture of f/22 had an exposure speed of 3 seconds

Looking into a corner away from the lamp an aperture of f/4 had an exposure speed of 3 seconds
Looking into a corner away from the lamp an aperture of f/13 had an exposure speed of 30 seconds

Looking into the darkest corner away from the lamp an aperture of f/4 had an exposure speed of bulb, the camera was unable to specify as suitable speed.

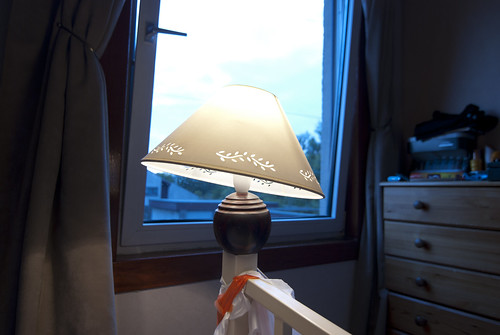
I then set the camera up pointing at the lamp and out of a window to the last of the light and photographed the three exposures as instructed in the exercise.

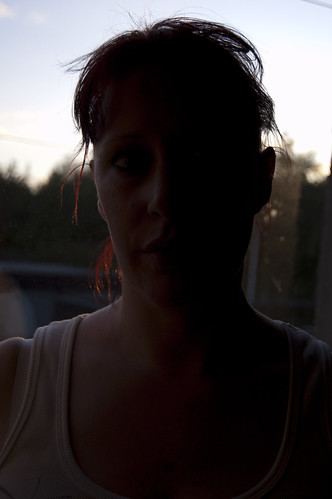
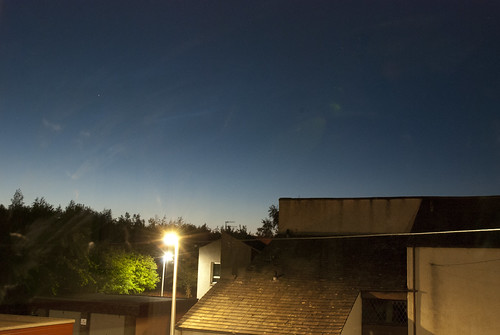
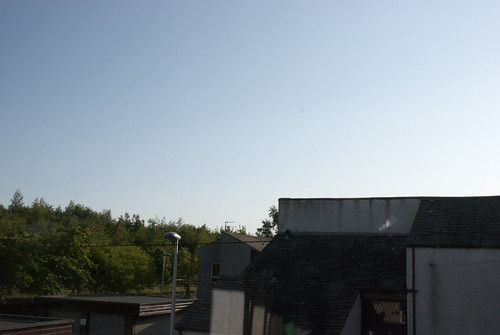
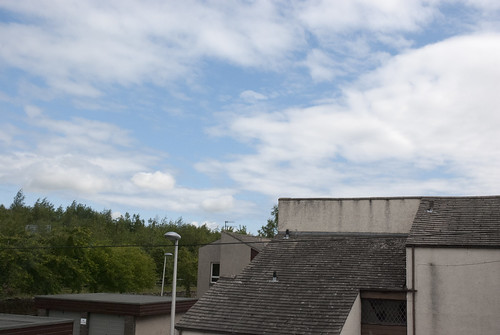
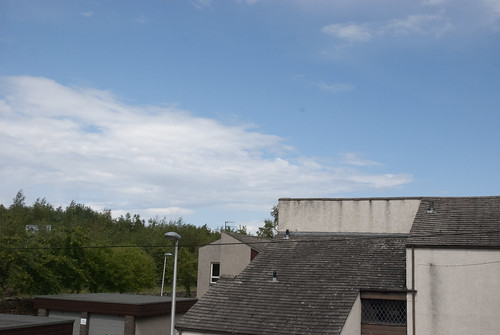
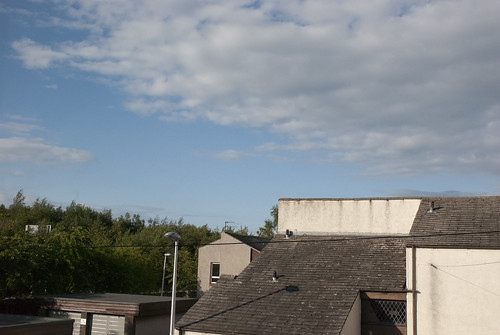
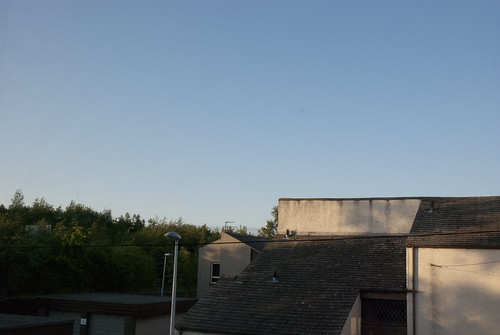
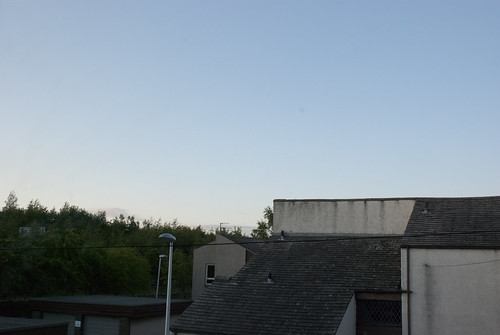
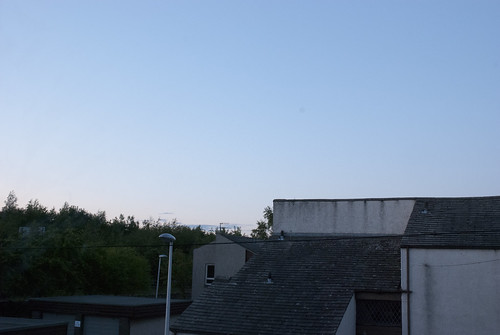
Interior Exterior – Auto White Balance

D80,Aperture f/4, Shutter Speed 1/30 sec, ISO 100, 16mm (35mm equivalent 24mm), Pattern Metering Mode, Auto White Balance, Tripod Mounted, 11-16mm lens

Interior Exterior - Tungsten and Daylight - Auto White Balance

The sky has taken on a cold blue hue and a lot of the detail in the sky has been lost as it has become a blown out white shape.

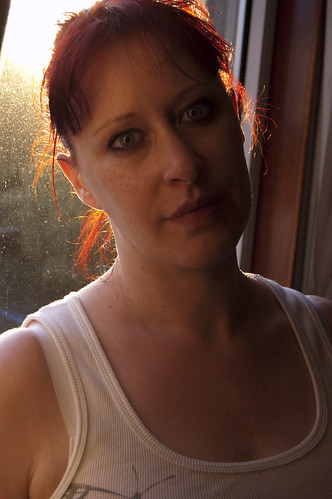
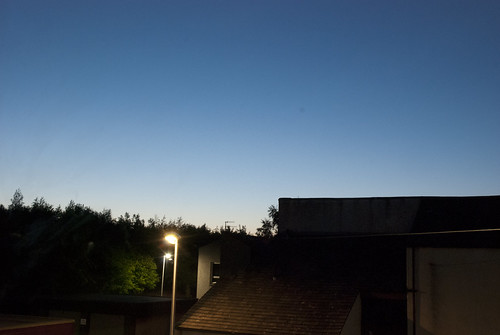
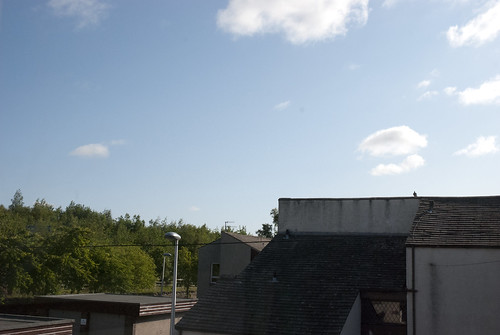
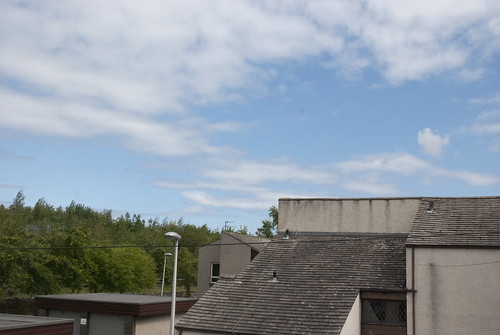
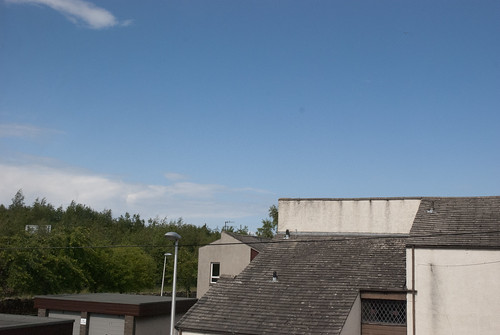
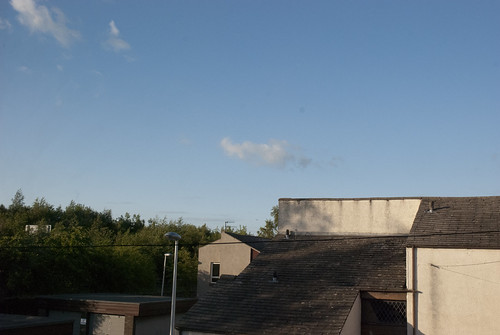
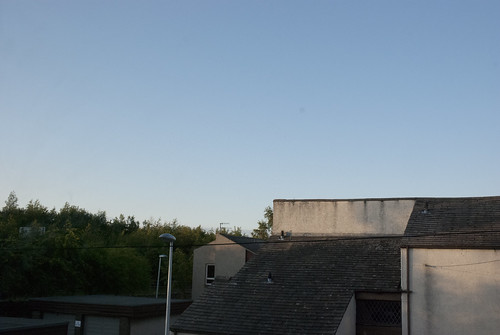
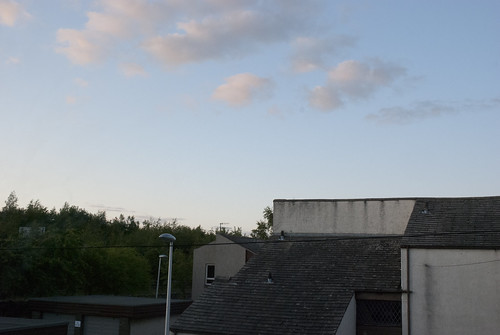
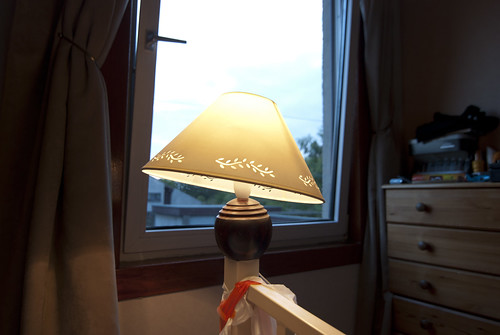
Interior Exterior – Daylight White Balance

D80,Aperture f/4, Shutter Speed 1/30 sec, ISO 100, 16mm (35mm equivalent 24mm), Pattern Metering Mode, Daylight White Balance, Tripod Mounted, 11-16mm lens

Interior Exterior - Tungsten and Daylight -Daylight White Balance

The sky has taken on a slight less cold blue hue but it probably we most accurate colour representation of the three images and a lot of the detail in the sky has been lost as it has become a blown out white shape. The lamplight has taken on a warmer yellow hue

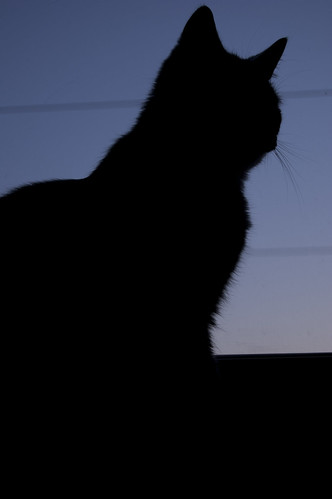
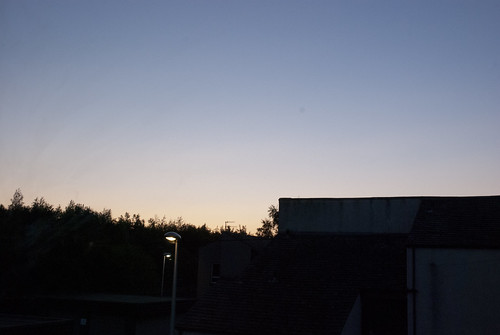
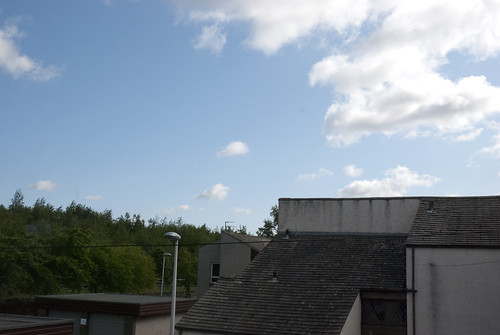
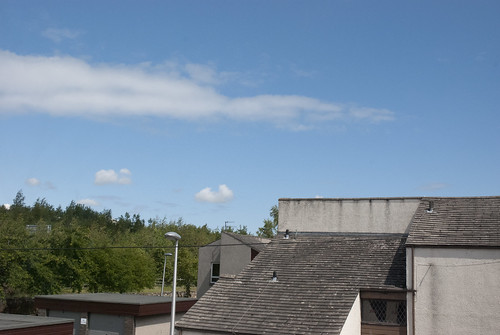
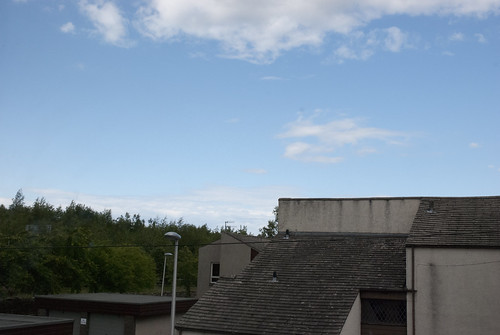
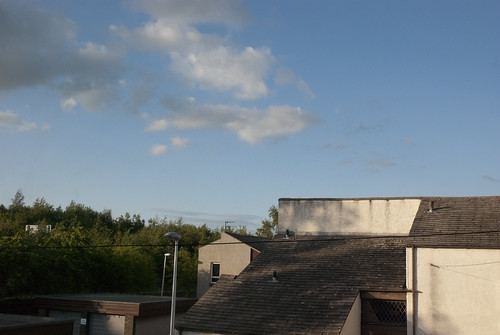
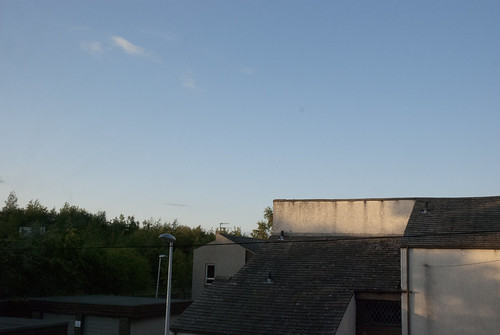
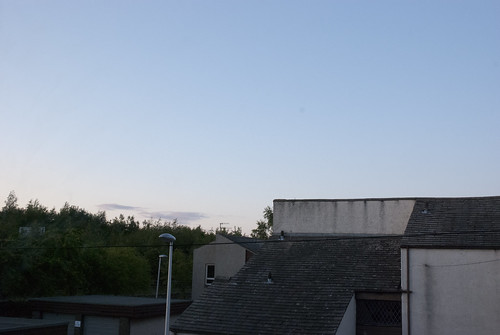
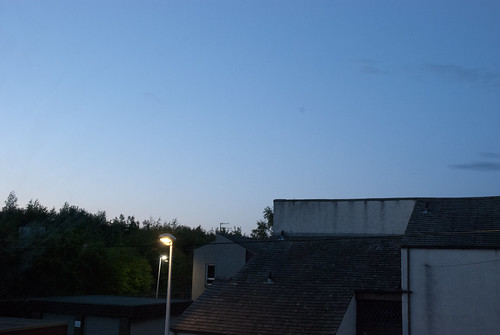
Interior Exterior – Tungsten White Balance

D80,Aperture f/4, Shutter Speed 1/30 sec, ISO 100, 16mm (35mm equivalent 24mm), Pattern Metering Mode, Tungsten White Balance, Tripod Mounted, 11-16mm lens

Interior Exterior - Tungsten and Daylight -Tungsten White Balance

The sky has taken on a very cold blue hue, some of the detail in the sky like the difference between the sky and the clouds remain but a lot of it has still been lost as it has become a blown out white shape. The lamp light is straw white and has a normal hue and tone for the tungsten bulb.

Exercise 36 Tungsten and Fluorescent lighting – Part Two

What: The main brief of this exercise was to take a number of pairs of interior photographs where the interior light was light with a CFL or Fluorescent bulb. The brief then asked for the pair of photographs to be taken where the White Balance was changed at each exposure from Auto to Fluorescent.
Where: In the house
When: Just as the sun had gone down and it was dark.
How: The first thing I did was set my camera up on a tripod to allow me to change the camera settings without changing the composition of the photograph. I then moved through the house looking for areas light by CFL and Fluorescent bulbs.
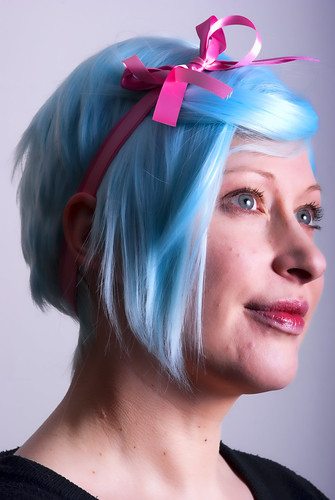
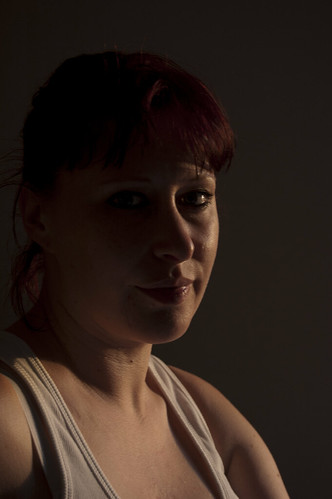
Louis.
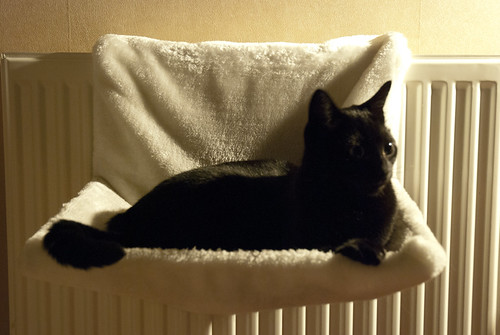
There pair of photographs were light by a single CFL bulb which was above and to the right of the subject. I noted that even at ISO 1250 I was not getting a lot of light from the bulb.

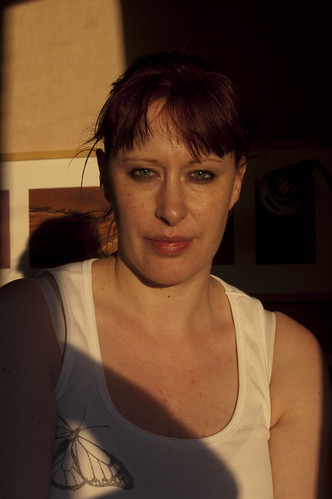
Louis – Auto White Balance – Single CFL Bulb

D80,Aperture f/5.6, Shutter Speed 1/3 sec, ISO 1250, 38mm (35mm equivalent 57mm), Pattern Metering Mode, Auto White Balance, Tripod Mounted, 18-70mm lens

Louis - Auto White Balance under CFL light

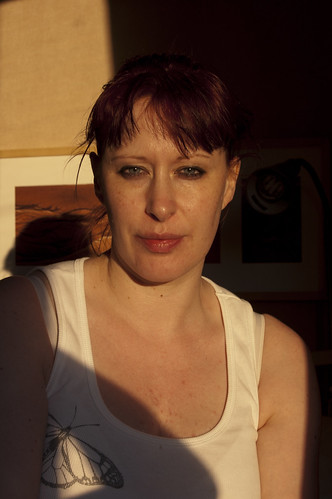
Louis – Fluorescent White Balance – Single CFL Bulb

D80,Aperture f/5.6, Shutter Speed 1/3 sec, ISO 1250, 38mm (35mm equivalent 57mm), Pattern Metering Mode, Fluorescent White Balance, Tripod Mounted, 18-70mm lens

Louis - Fluorescent White Balance under CFL light

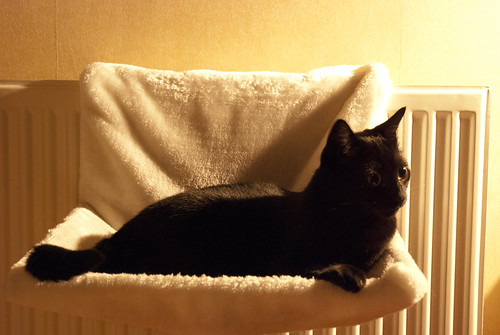
I can see that using the Fluorescent white balance produces a warm image with less detailed contrast, the Auto white balance again produces a straw white neutral white balance.
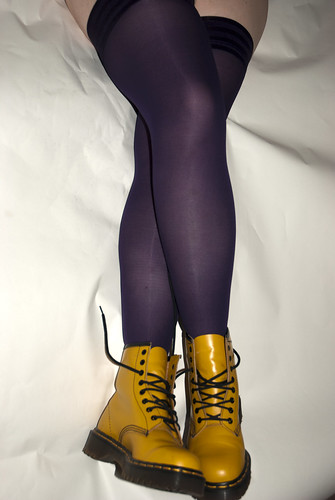
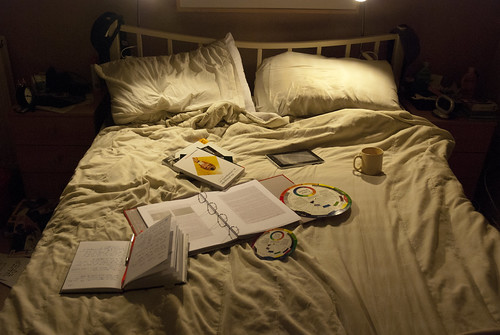
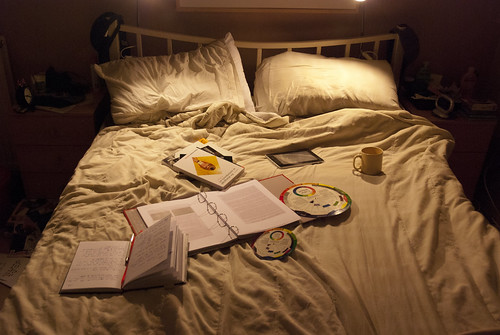
Room Study

The bed and objects are light with two CFL bulbs above and to the rear of the subjects. Again I had to use a tripod as there was little light coming from the CFL bulbs
Room Study – Auto White Balance – Two CFL Bulbs

D80,Aperture f/5.6, Shutter Speed 1/15 sec, ISO 1250, 24mm (35mm equivalent 36mm), Pattern Metering Mode, Auto White Balance, Tripod Mounted, 18-70mm lens

Room Study Still LIfe - Auto White Balance under CFL light

Room Study – Fluorescent White Balance – Two CFL Bulbs

D80,Aperture f/5.6, Shutter Speed 1/15 sec, ISO 1250, 24mm (35mm equivalent 36mm), Pattern Metering Mode, Fluorescent White Balance, Tripod Mounted, 18-70mm lens

Room Study Still LIfe - Fluorescent White Balance under CFL light

Again the Fluorescent white balance has produced a warm red tinted hue while the Auto White Balance has been neutral.

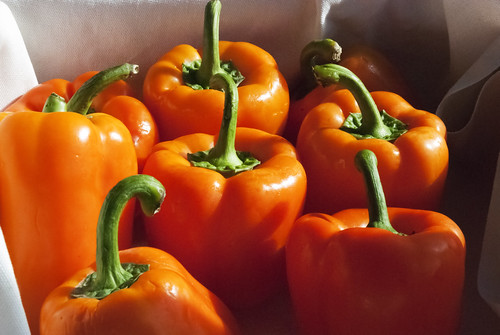
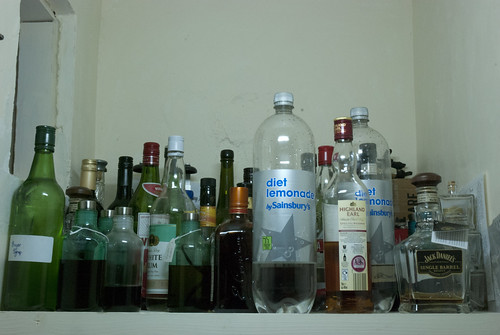
Drinks Shelf light from above and in front from a single fluorescent strip bulb light.
Drinks Shelf – Auto White Balance – Single Fluorescent Bulb

D80,Aperture f/27, Shutter Speed 1.5 sec, ISO 1250, 31mm (35mm equivalent 46mm), Pattern Metering Mode, Auto White Balance, Tripod Mounted, 18-70mm lens

Drinks Shelf - Auto White Balance under Fluorescent Light

Drinks Shelf – Fluorescent White Balance – Single Fluorescent Bulb

D80,Aperture f/27, Shutter Speed 1.5 sec, ISO 1250, 31mm (35mm equivalent 46mm), Pattern Metering Mode, Fluorescent White Balance, Tripod Mounted, 18-70mm lens

Drinks Shelf - Fluorescent White Balance under Fluorescent Light

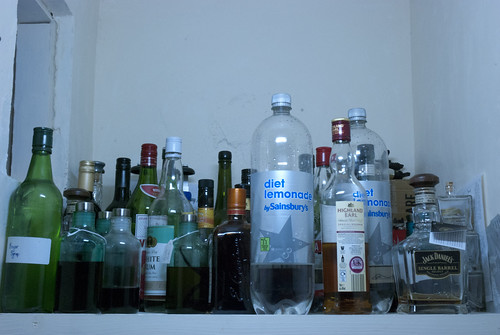
I was surprised to see that under a normal Fluorescent bulb rather than a CFL bulb that the light produced was a cold bulb light and that even under the Auto white balance the image took on a cold tint to it. Using the fluorescent white balance produced an even colder image as the light was bluer and colder.

I have learned that there is a great difference in the colouration of artificial light and that even the same white balance can produce differing results due to the light source. Until this exercise this was something I did not know and I thought that all fluorescent light produced the same results through the fluorescent white balance; this is something that I will have to look out for when using artificial lighting.

Thursday 7 July 2011

Exercise 35 Cloudy Weather and Rain – Parts One, Two and Three

Exercise 35 Cloudy Weather and Rain – Part One


What: The main brief of this exercise was to take a pair of photographs of the same subject where the difference would be that one would be under cloud and one would be under sunlight
Where: In a nearby field and in the garden
When: As the day progressed I managed to get cloud, sun and rain all in the one day.
How: I tried to find the same position each time and then once the camera was set up, not adjust it and try and get the same composition the next time using my notes and a quick sketch.

The first image I took was when I was setting out for the day to take the images for this exercise, I could see that it was about to rain and that in the distance the clouds were low and the day was overcast.

Cloud One - Hills Overcast

D80,Aperture f/22, Shutter Speed 1/45 sec, ISO 1000, 24mm (35mm equivalent 36mm), Pattern Metering Mode, Daylight White Balance, Hand Held, 18-70mm lens

Cloudy one part one

Cloud One - Hills Sunlight

I got on my return later in the day.

D80,Aperture f/22, Shutter Speed 1/125 sec, ISO 500, 24mm (35mm equivalent 36mm), Pattern Metering Mode, Daylight White Balance, Hand Held, 18-70mm lens

Cloudy one part two

The first thing I noticed was that I had to bring the ISO down from 1000 to 500 to even attempt the same settings for speed and aperture on the camera. I could also only get the same aperture by increasing the speed; so there was a vast difference in the amount of light coming into the lens. I also noticed that the landscape looked brighter and less blue in the second image and in the second image these was more of a yellow hue to the light. I could also make out more detail as the clouds were not so low.

Clouds Two - Flowers Sunlight

Sitting at the edge of the field tucked in beside all the grass and weeds was a small blue/violet flower. The colour caught my eye and I noted its’ position and returned to photograph it later in the day.

D80,Aperture f/19, Shutter Speed 1/125 sec, ISO 500, 48mm (35mm equivalent 72mm), Pattern Metering Mode, Daylight White Balance, Hand Held, 18-70mm lens

Cloudy two part one

Clouds Two – Flowers Clouds

D80,Aperture f/13, Shutter Speed 1/125 sec, ISO 500, 48mm (35mm equivalent 72mm), Pattern Metering Mode, Daylight White Balance, Hand Held, 18-70mm lens

Cloudy two part two

I was luckier here and managed to keep the same ISO and speed settings. I could see that there was a 3 f/stop difference between the two images and that the shadows were less well defined in the second image.

Clouds Three – Sunlight

D80,Aperture f/22, Shutter Speed 1/125 sec, ISO 500, 65mm (35mm equivalent 97mm), Pattern Metering Mode, Daylight White Balance, Hand Held, 18-70mm lens

Cloudy three part one

Clouds Three – Clouds

D80,Aperture f/13, Shutter Speed 1/125 sec, ISO 500, 65mm (35mm equivalent 97mm), Pattern Metering Mode, Daylight White Balance, Hand Held, 18-70mm lens

Cloudy three part two

A difference of 4 f/stops. Here I could see a difference in the background colours as well as a loss of shadow from the birdbath. There is also a slight loss of detail and tonal range in the second image as the contrast between dark and light is not so great.


Exercise 35 Cloudy Weather and Rain – Part Two

What: The main brief of this exercise was to take three photographs of a subject outdoors where the day was overcast. To make the good use of the enveloping shapeless light.
Where: In a nearby park
When: Mid morning, just after a short rain shower, where the sky was grey and covered in low cloud.
How: I moved around the tree stump until I found a couple of locations on the subject where I could get photographs of the detail through the relief of the subject..

The first image I took was when I was setting out for the day to take the images for this exercise, I could see that it was about to rain and that in the distance the clouds were low and the day was overcast.

Overcast One

I noticed the green colour of the moss against the grey and brown of the tree stump. I moved close in to prevent any shadow being cast by nearby branches and photographed the texture and detail of the bark.

D80,Aperture f/8, Shutter Speed 1/30 sec, ISO 1600, 52mm (35mm equivalent 78mm), Pattern Metering Mode, Daylight White Balance, Hand Held, 18-70mm lens

Overcast one

I really like the stark green of the moss against the trunk and I was surprised to see how much detail and relief came out of the bark even through the light was pretty much uniform. I like the breakup and shadow of the bark and the many different shaded and shapes that it makes.


Overcast Two

D80,Aperture f/8, Shutter Speed 1/15 sec, ISO 1600, 18mm (35mm equivalent 27mm), Pattern Metering Mode, Daylight White Balance, Hand Held, 18-70mm lens

Overcast two

As I moved around the stump I took a step back and noticed that uniformity of light and that in some places of the stump there were not colour differences due to the uniformity of the light. I did like however the fact that I could follow the lines and shapes of the bark and that the detail and texture of the bark were brought out by the light.

Overcast Three

Again moving around the tree, into a area which I had thought would have been in more shadow I picked out the green and brown of the stump again. I noted that there was little difference in the levels of light on either side of the stump and that even after the rain, the levels of light on the trunk allowed me to pick out the shape, the shadows and the texture of the bark.

D80,Aperture f/8, Shutter Speed 1/10 sec, ISO 1600, 18mm (35mm equivalent 27mm), Pattern Metering Mode, Daylight White Balance, Hand Held, 18-70mm lens

Overcast three


Exercise 35 Cloudy Weather and Rain – Part Three


What: The main brief of this exercise was to take a number of photographs outdoors where it was raining.
Where: In a nearby town and streets
When: Mid morning, when it was raining and where the sky was grey and covered in low cloud.
How: I moved around looking for good locations to photograph where I could see that the rain had brought additional effects to the location.

Rain One

D80,Aperture f/4, Shutter Speed 1/2000 sec, ISO 1000, 105mm (35mm equivalent 157mm), Pattern Metering Mode, Daylight White Balance, Hand Held, 105mm lens

Rain one

It had just started to rain and as I looked out a window I noted the water droplets gathering on a line. I went outside and with a macro lens look the image of the small droplets on the line after composing on the droplets which reflected both the sky and the house. While I like the composition on the droplets I am not too happy with the overall composition as the background is just a washed out underexposed grey detail less sky.

Rain Two

I went out and about heading for the middle of the town, as it is mainly covered in slabs and it had the most amounts of people passing through on a rainy day.
Lining up on the misaligned bollards I shot along the front of the local court house, getting the repetition of the buckets and planters along the pavement. I was looking to capture the reflections of the colours in the rain slicked pavements. I am very happy with this as I managed to get the browns, reds and greens reflected and the image shows what a damp day it was.


D80,Aperture f/8, Shutter Speed 1/500 sec, ISO 1000, 34mm (35mm equivalent 51mm), Pattern Metering Mode, Daylight White Balance, Hand Held, 18-70mm lens

Rain two

Rain Three

As I travelled back to the car, I was looking around me for more examples of the rain and wet weather; I looked up and noticed the droplets hanging off the leaf. I quickly shot a bracketed set of images as I was not sure how the light was going to affect the final image due to the light travelling though the branches, the leaves above and the fact that I was using a telephoto lens.

D50,Aperture f/5.6, Shutter Speed 1/180 sec, +0.5, ISO 200, 112mm (35mm equivalent 169mm), Pattern Metering Mode, Daylight White Balance, Hand Held, 55-200mm lens

Rain three

I learned a lot from this exercise.

1. There is a huge difference in the amount of light between a bright day and a cloud day. This will have an effect on not only the shutter speed and aperture choice, but it will have a effect on the colour of the light and on the depth of the shadows in the image.
2. That overcast days can be used to bring out the detail in a subject through the use of the uniform light. Look for detail and texture within the subject and take advantage of the flat light to bring out the shade and depth of the subject through the use of texture and relief.
3. Rain should not mean that you cannot photograph. I was surprised to see that the rain brought out a lot of colour, shape and shadow in things which would normally be uniform and blank. Buildings, paths and the sky can all be photographed during the rain as in a lot of cases the rain adds colour, shade, relief and shape to objects.

Assignment 3 – Colour - Resubmissions

After discussion with my tutor I decided to resubmit five of the images for assignment 3 again.
They are as follows;

Colour Harmony – Red and Green


D80,Aperture f/29, Shutter Speed 1/320 sec, ISO 3200, 105mm (35mm equivalent 157mm), Pattern Metering Mode, Auto White Balance, Tripod Mounted, 105mm lens

Colour Harmony - Red and green

I felt that this was a stronger composition and that the fruit really showed off the colour properly.

Colour Harmony – Yellow and Violet

I struggled to get a good composition on this one without going over the boundaries of good taste. In the end I decided to go with this composition as it was the simplest and had the best hue of yellow.

D80,Aperture f/4, Shutter Speed 1/200 sec, ISO 100, 29mm (35mm equivalent 34mm), Pattern Metering Mode, Auto White Balance, Hand Held, 18-70mm lens

Colour Harmony - Violet and Yellow

Colour Wheel 3rd Spacing – Orange and Green

Following the suggestion from my tutor I went back and had a look at the original image as it was commented that the light and composition were too weak. I followed on from the idea from red and green and purchased a number of orange peppers and stacked them into a box, placed them next to a window in direct sunlight and photographed them as they were side light.

D80,Aperture f/29, Shutter Speed 1/640 sec, ISO 3200,48mm (35mm equivalent 72mm), Pattern Metering Mode, Auto White Balance, Tripod Mounted, 18-70mm lens

Colour Wheel 3rd Spacing - orange and green

Colour Wheel 3rd Wheel Spacing – Blue and Pink

Again I played with this for a while as I could not get the composition or the colour correct. In the end I decided to play with a very light blue wig and had the model wear a pink ribbon and pink lipstick for the image.

D80,Aperture f/13, Shutter Speed 1/125 sec, ISO 100, 105mm (35mm equivalent 157mm), Pattern Metering Mode, Flash White Balance, Hand Held, 105mm lens

Colour Wheel 3rd Spacing- Light blue and Pink

Colour Spot or Accent – Single Blue

I worked this one quite quickly and did a rough shoot to test the idea, I liked it so much that I just reset the layout of the matches a few times before shooting the final image.

D80,Aperture f/29, Shutter Speed 1/1000 sec, ISO 3200, 70mm (35mm equivalent 105mm), Pattern Metering Mode, Daylight White Balance, Tripod Mounted, 105mm lens

Colour spot or accent - single blue


I am happier with these images as they forced me to go back and re-examine some of my submissions and decide where I needed to do more work and to rethink some of my original ideas.

Wednesday 6 July 2011

Exercise 34 Variety with a low sun

What: The main brief of this exercise was to take a number of photographs when the sun is low; to demonstrate four differing styles of lighting
Where: At the house
When: Just as the sun was setting.
How: The camera was moved around the subject and the subject was also moved to allow the four different lighting styles to be demonstrated; frontal lighting, side lighting, back lighting and edge lighting.

I started by looking at the sunrise and sunset times for a particular day, I then waited until I judged the right moment and through using differing positions, experiments and locations I finally got a number of photographs that I liked.

Frontal Lighting;
Where the sun is behind the camera and is striking the subject fully. I decided her to use a telephoto lens to allow me to have some distance from my subject as this allowed me to take the photograph without being in the frame.

1.
D50,Aperture f/14, Shutter Speed 1/40 sec, ISO 200, 55mm (35mm equivalent 82mm), Pattern Metering Mode, Daylight White Balance, Hand Held, 18-55 lens

front lighting one

2.
D50,Aperture f/13, Shutter Speed 1/40 sec, ISO 200, 55mm (35mm equivalent 82mm), Pattern Metering Mode, Daylight White Balance, Hand Held, 18-55 lens

front lighting two

The main issue I had here was that the subject had the low sun in her eyes so I had to move her slightly off centre to allow her to look forward without being blinded by the sun. However I did see that it cast long dark shadows on the subject.

Side Lighting
I quickly found moving my position was not the only answer to this example and that I could also move the subject around as well to improve or reduce the strength and effect of the light.

1.
D50,Aperture f/5.6, Shutter Speed 1/40 sec, ISO 200, 55mm (35mm equivalent 82mm), Pattern Metering Mode, Daylight White Balance, Hand Held, 18-55 lens

Side lighting one


2.
D50,Aperture f/5.6, Shutter Speed 1/750 sec, ISO 1600, 55mm (35mm equivalent 82mm), Pattern Metering Mode, Daylight White Balance, Hand Held, 18-55 lens

Side lighting two

I really liked the quality of light here and the way that the subject was partially cast in shadows. I thought that it made for some moody lighting and I liked the way that it broke down the subject into light and shadow.

Back Lighting
I did this over two days as the first image was an experiment with a very low sun and a very low position looking up at the subject and into the light.

1.
D50,Aperture f/5.6, Shutter Speed 1/40 sec, ISO 200, 55mm (35mm equivalent 82mm), Pattern Metering Mode, Daylight White Balance, Hand Held, 18-55 lens

Back lighting one

2.
D50,Aperture f/7.1, Shutter Speed 1/40 sec, ISO 200, 55mm (35mm equivalent 82mm), Pattern Metering Mode, Daylight White Balance, Hand Held, 18-55 lens

Back lighting two

3.
D50,Aperture f/14, Shutter Speed 1/40 sec, ISO 200, 55mm (35mm equivalent 82mm), Pattern Metering Mode, Daylight White Balance, Hand Held, 18-55 lens

Back lighting three

I liked the fact that with back lighting, it did not have to be all silhouette and nothing else, and that with careful positioning you could get a well light image that did not have any lens flare.

Edge Lighting
This I found the hardest as I would normally use edge lighting when I am using artificial lighting and I had not tried it using natural lighting and a low sun position. I really had to tray hard to get this correct and had quite a number of attempts to position myself correctly.

1.
D50,Aperture f/5.6, Shutter Speed 1/40 sec, ISO 200, 55mm (35mm equivalent 82mm), Pattern Metering Mode, Daylight White Balance, Hand Held, 18-55 lens

Edge lighting two

I really did learn a lot about the positioning of subjects and the use of a low sun in lighting. I especially enjoyed the back lighting and trying and finally succeeding in getting the edge lighting as I found this the hardest example to do without using artificial lighting. I also really like the quality of light a low sun can bring to an image.

Friday 1 July 2011

Exercise 33 - Light Through the day

What: The main brief of this exercise was to take a sequence of photographs throughout the day using the same subject and composition to study what happens when the sun moves across the sky and the impact this has on shade and creating urgency to landscapes Where: In the house
When: Through the day
How: The camera was positioned on a tripod overlooking a local shared area, a pathway and out over some trees. A combined camera release and intervalometer was used to allow the camera to count down until the first shot and the take a subsequent number of photographs at identical timed intervals.

I started by looking at the sunrise and sunset times for a particular day as I had checked the long range weather forecasts and the weather was clear and bright. From the sunrise/sunset tables I noted that the sun would rise at about 04:28 and set at about 22:01, I then planned for the camera to start taking photographs at about 02:00 to capture the “false” sunrise and I knew that I could then use the cable release button to take extra photographs when I wanted without interfering or adjusting the timed interval.
I set the camera up on a tripod high out of the way so that it could not be knocked by a passing cat or have a cat in the middle of the composition. I set the camera to daylight white balance and the aperture to f/11, this way the camera could control the speed so that the photographs would not be over or under exposed.

As I sat through the day looking at the sky I was interested to see what would be captured as I was not always sure that I could see a difference in the light and colouration of the sky. However when looking through the final images I could see a difference in colours;


02:10
D80,Aperture f/11, Shutter Speed 7.1 sec, ISO 1000, 27mm (35mm equivalent 40mm), Pattern Metering Mode, Daylight White Balance, tripod mounted, 18-70 lens

DSC_0039


03:10
D80,Aperture f/11, Shutter Speed 1.0 sec, ISO 1000, 27mm (35mm equivalent 40mm), Pattern Metering Mode, Daylight White Balance, tripod mounted, 18-70 lens

DSC_0040

04:10
D80,Aperture f/11, Shutter Speed 1/45 sec, ISO 1000, 27mm (35mm equivalent 40mm), Pattern Metering Mode, Daylight White Balance, tripod mounted, 18-70 lens

DSC_0041

05:10
D80,Aperture f/11, Shutter Speed 1/1000 sec, ISO 1000, 27mm (35mm equivalent 40mm), Pattern Metering Mode, Daylight White Balance, tripod mounted, 18-70 lens

DSC_0042

06:10
D80,Aperture f/11, Shutter Speed 1/1500 sec, ISO 1000, 27mm (35mm equivalent 40mm), Pattern Metering Mode, Daylight White Balance, tripod mounted, 18-70 lens

DSC_0043

07:09
D80,Aperture f/11, Shutter Speed 1/1500 sec, ISO 1000, 27mm (35mm equivalent 40mm), Pattern Metering Mode, Daylight White Balance, tripod mounted, 18-70 lens

DSC_0044

08:09
D80,Aperture f/11, Shutter Speed 1/1500 sec, ISO 1000, 27mm (35mm equivalent 40mm), Pattern Metering Mode, Daylight White Balance, tripod mounted, 18-70 lens

DSC_0045_01

09:09
D80,Aperture f/11, Shutter Speed 1/1000 sec, ISO 1000, 27mm (35mm equivalent 40mm), Pattern Metering Mode, Daylight White Balance, tripod mounted, 18-70 lens

DSC_0046_01

10:09
D80,Aperture f/11, Shutter Speed 1/1000 sec, ISO 1000, 27mm (35mm equivalent 40mm), Pattern Metering Mode, Daylight White Balance, tripod mounted, 18-70 lens

DSC_0047_01

11:13
D80,Aperture f/11, Shutter Speed 1/1000 sec, ISO 1000, 27mm (35mm equivalent 40mm), Pattern Metering Mode, Daylight White Balance, tripod mounted, 18-70 lens

DSC_0048_01

12:09
D80,Aperture f/11, Shutter Speed 1/1000 sec, ISO 1000, 27mm (35mm equivalent 40mm), Pattern Metering Mode, Daylight White Balance, tripod mounted, 18-70 lens

DSC_0049_01

13:09
D80,Aperture f/11, Shutter Speed 1/1000 sec, ISO 1000, 27mm (35mm equivalent 40mm), Pattern Metering Mode, Daylight White Balance, tripod mounted, 18-70 lens

DSC_0050_01

14:09
D80,Aperture f/11, Shutter Speed 1/1500 sec, ISO 1000, 27mm (35mm equivalent 40mm), Pattern Metering Mode, Daylight White Balance, tripod mounted, 18-70 lens

DSC_0051_01

15:09
D80,Aperture f/11, Shutter Speed 1/1000 sec, ISO 1000, 27mm (35mm equivalent 40mm), Pattern Metering Mode, Daylight White Balance, tripod mounted, 18-70 lens

DSC_0052_01

16:09
D80,Aperture f/11, Shutter Speed 1/1500 sec, ISO 1000, 27mm (35mm equivalent 40mm), Pattern Metering Mode, Daylight White Balance, tripod mounted, 18-70 lens

DSC_0053_01

17:09
D80,Aperture f/11, Shutter Speed 1/750 sec, ISO 1000, 27mm (35mm equivalent 40mm), Pattern Metering Mode, Daylight White Balance, tripod mounted, 18-70 lens

DSC_0054_01

18:09
D80,Aperture f/11, Shutter Speed 1/750 sec, ISO 1000, 27mm (35mm equivalent 40mm), Pattern Metering Mode, Daylight White Balance, tripod mounted, 18-70 lens

DSC_0055_01

19:09
D80,Aperture f/11, Shutter Speed 1/1000 sec, ISO 1000, 27mm (35mm equivalent 40mm), Pattern Metering Mode, Daylight White Balance, tripod mounted, 18-70 lens

DSC_0056

20:03
D80,Aperture f/11, Shutter Speed 1/750 sec, ISO 1000, 27mm (35mm equivalent 40mm), Pattern Metering Mode, Daylight White Balance, tripod mounted, 18-70 lens

DSC_0057

20:09
D80,Aperture f/11, Shutter Speed 1/750 sec, ISO 1000, 27mm (35mm equivalent 40mm), Pattern Metering Mode, Daylight White Balance, tripod mounted, 18-70 lens

DSC_0058

20:27
D80,Aperture f/11, Shutter Speed 1/500 sec, ISO 1000, 27mm (35mm equivalent 40mm), Pattern Metering Mode, Daylight White Balance, tripod mounted, 18-70 lens

DSC_0059

20:48
D80,Aperture f/11, Shutter Speed 1/500 sec, ISO 1000, 27mm (35mm equivalent 40mm), Pattern Metering Mode, Daylight White Balance, tripod mounted, 18-70 lens

DSC_0060

20:52
D80,Aperture f/11, Shutter Speed 1/350 sec, ISO 1000, 27mm (35mm equivalent 40mm), Pattern Metering Mode, Daylight White Balance, tripod mounted, 18-70 lens

DSC_0063

20:58
D80,Aperture f/11, Shutter Speed 1/350 sec, ISO 1000, 27mm (35mm equivalent 40mm), Pattern Metering Mode, Daylight White Balance, tripod mounted, 18-70 lens

DSC_0064

21:09
D80,Aperture f/11, Shutter Speed 1/250 sec, ISO 1000, 27mm (35mm equivalent 40mm), Pattern Metering Mode, Daylight White Balance, tripod mounted, 18-70 lens

DSC_0065

21:20
D80,Aperture f/11, Shutter Speed 1/180 sec, ISO 1000, 27mm (35mm equivalent 40mm), Pattern Metering Mode, Daylight White Balance, tripod mounted, 18-70 lens

DSC_0066

21:33
D80,Aperture f/11, Shutter Speed 1/125 sec, ISO 1000, 27mm (35mm equivalent 40mm), Pattern Metering Mode, Daylight White Balance, tripod mounted, 18-70 lens

DSC_0067

21:52
D80,Aperture f/11, Shutter Speed 1/60 sec, ISO 1000, 27mm (35mm equivalent 40mm), Pattern Metering Mode, Daylight White Balance, tripod mounted, 18-70 lens

DSC_0068

22:04
D80,Aperture f/11, Shutter Speed 1/20 sec, ISO 1000, 27mm (35mm equivalent 40mm), Pattern Metering Mode, Daylight White Balance, tripod mounted, 18-70 lens

DSC_0069

22:09
D80,Aperture f/11, Shutter Speed 1/15 sec, ISO 1000, 27mm (35mm equivalent 40mm), Pattern Metering Mode, Daylight White Balance, tripod mounted, 18-70 lens

DSC_0071

22:39
D80,Aperture f/11, Shutter Speed 1/3 sec, ISO 1000, 27mm (35mm equivalent 40mm), Pattern Metering Mode, Daylight White Balance, tripod mounted, 18-70 lens

DSC_0072


I was surprised to see how much difference the changes in light made to shade and colours, as the sun moved around the sky I could see the greenery change colour and the shadows move as well as darken and the shadows elongate and then develop a light red hue when the sun started to set. I was expecting less of a difference through the day, but again I was surprised to see how much difference there actually was during the entire day, much more than I had expected.

This will have an effect on when I take photographs during the day, as obviously the light will change as per exercise 32, but the effect on shadows and colours towards the end of the day has impressed me and I think that when I come to do some landscape photography I will certainly keep this lesson in mind and remember the interaction of the light, the movement of the sun, the difference is white balance and the whole affect of sun and shadow.


Links to more information on Intervalometer and their use.

Wikipedia - http://en.wikipedia.org/wiki/Intervalometer#Photography
John Rappolds Blog - http://johnrappold.org/photoblog/?p=409 His type of device is almost the same as the one I obtained.